
Chapters are ordered as it follows:
- History and the Benefits of Soft-Overclocking Nowadays
- How to Overclock LSDj ROM
- Amplitude Modulation Synthesis - Overclocking Hum
- Workflow changes (Groove/Tempo/BPM relation)
- CPU usage
- Controlling the Extra Hum
- Hum Pitch table
- Commands generating Hum
- MultiHum
- Quickstart mini guide (for impatient ones)
- WAV channel
- Another look at the tables - Summary
- Extra notes,Credits
[NOTE: Guide has JUST been released, and though I tried to make it as complete as possible, I'll be probably making small fixes/adjustments or adding stuff based on YOUR feedback in upcoming couple weeks!]
History of Software overclocking LSDj starts by Pain Perdu in 2017 using version 5.3.5.(Archived link for the article here) Results were impressive, but due to heavier CPU usage while overclocked, users would experience serious drawbacks, making usage less than desirable and unstable. However, version 8 improved dramatically in those terms, and now, even in heavy modulation situations where previous versions would crash or stop, Here there's no hint of any slow-down! Consequently, overclocking LSDj from version 8 onwards should be more than pleasureable experience, providing much greater headroom than previous versions!
Benefits of Software Overclocking LSDj are new wicked types of sound design, enabling multitimbrality on each channel and amplitude modulation synthesis! Overclocked LSDj will play any of your non-OC saves four times faster: 4x speed of LSDj engine means that every table modulation, grooves, and whole sequencer will play four times faster. It will require something stronger CPU-wise than an original model GameBoy (GameBoy Color, GameBoy Advance, or an emulator like BGB for the best results), though no hardware mods are required at all! The guide below will explain many tips and tricks regarding overclocking, but it is designed for advanced LSDj users who are confident in normal LSDj operation and seek to get out more out of it.
Warning: Even though my guide is there to help you with your OC experience, keep in mind that developer doens't support this technique, and might not be able to help you in case a song-breaking glitch happens! (though my experience has been very stable with this overclocking, putting the word of caution out)
Another note: all notes below were observed while using BGB emulator in GBC mode on Windows. Experience on other platforms may wary, but I'll be more than happy to expand the guide with notes from other platforms.
Modifying your ROM to be overclocked is actually fairly easy, possible to do on any platform that has hex Editor.
This will not affect any other data of LSDj: your kits, palettes, all are safe.
Still, remember to backup your ROM before you modify your precious tracker!
To benefit fully from this guide please use LSDj version above v8

(picture showcasing step 2)
Step by step instructions:
- Open up your LSDj ROM in the hex editor of your choice (I used HxD on Windows);
- Search first hex-value string
3E04E007; - Replace it with
3E07E007; (Notice: We are changing esensially only second value04to07) - Save;
Your LSDj's tempo should be multiplied by four now!
The magic of overclocking is largely dependant on LSDj's TEMPO parameter.
It's responsible for LSDj's engine speed, therefore increasing it will speed up all modulation happening,
and slowing it down will make your tables much slower.
When performing extremely rapid modulation (high tempo) of particular commands/effects
(for example: a table with "O--", "OLR" and "H00")
a hum of a specific pitch will be produced!
It happens because of Gameboy's natural behavior:
while switching between "E", "O" or "W" command, a click happens
which when done in rapid succession generates the hum you can hear.
This hum is generated with Amplitude Modulation synthesis, (or simply, AM synthesis)
which can be thought of as an extra oscillator in the channel.
AM synthesis, in the context of LSDj, works by rapidly changing volume, note or pulse width at a certain frequency.
This frequency is generated by placing mentioned above commands in the Table.
The Table speed is dependent on the TEMPO parameter,
but the actual produced Hum frequency is dependent on how long the modulation is.
The higher the tempo, the faster the table will be cycled through,
thus the higher the initial pitch.
Initial, because you can achieve even more by manipulating the table by increasing/decreasing the "OFF/O--" time.
Said hum does not come out of nowhere, but shares the channel together with other sounds happening there, each one "fighting each other, and one may strip other from some frequencies to fit in, which is absolutely normal behaviour, and you can design your sounds around that, giving one or the other more priority.
There's multiple differences between normal stock LSDj and overclocked one that you'll need to get used to,
especially when transferring your previous songs and using them there.
Major change in OC version is that whole LSDJ TEMPO is multiplied by 4.
That means that your standard 6tick-Groove song tempo 150 will play like it was 600!
Because tempo is tied to many parameters, you need to adjust your:

- Grooves;
- Tables (Placing appropiate "
G" command somewhere inside them so your modulation plays correctly); - Commands like D,K,R,W;
- Instrument Command rate;
- Wave instrument speeds;
Because the tempo dictates the actual pitch of the hum,
you will find yourself adjusting TEMPO to achieve desired pitch,
so you need to separate the TEMPO = BPM workflow.
Instead, to actually achieve BPM you want (or precisely tell which one you're using) use following formula:
BPM = (Tempo x 96)/[4 rows of your groove setting]
[Note: 96 comes from having default 6 ticks per step groove, times 4 to achieve ticks per beat(24),
then times 4 to reach actual value that OverClocked LSDj is using (96)]
Using the formula above you should calculate that picture above runs actually 138 BPM!
A good practice is to make sure your grooves are divisible by two in order to achieve half tempo if desired.
It is highly recommended to use GBC and above for optimal performance, (or make sure your emulator is running in GBC mode) as DMG cannot handle modulation well in high speed on more than 1 channel.
If you thought about using 2xOC-LSDj synced together, don't expect a lot of stability -
Intense moments in your songs will slightly desync them, very high TEMPO should be avoided to prevent that.
For some reason I cannot start start all 8 channels at once on some songs, still investigating that.
Also small note, as for now, using official LSDj patcher and upgrading ROM will overwrite the overclock, making you redo the process in hex editor, but that's not big issue!
Overclocking can be very taxing on the Gameboy's CPU, and reaching the "TOO BUSY!" state is more than easy.
The faster the "TEMPO", the faster the modulation, therefore CPU has to work harder to keep up.
If you're maintaining high "TEMPO" and using multiple effects/techniques playing at once
this can lead to sequencer desync/slowdown, or crash Gameboy/LSDj! Here's couple factors I noticed:
- Stacking exactly same Command/Value in tables puts extra pressure
(i.e. Having multiple "O
LR" in a row does no good and only the 1st one is needed); - Even empty table adds pressure, especially when
Hopped tighter; - Transposing does nothing to CPU;
- lIVE MODE is more taxing than simple SONG mode;
- Holding B button when sequence is playing puts pressure on CPU, because LSDj gets ready to mute/solo channels;
- "
E" command next to "V" are most CPU taxing commands; - "
O" and "W" don't put as much pressure; Vthere's no big difference between x1-xF, left side does impact each value;- Slower songs are also easier for CPU;
- If you can, try to end tables with "A
20" instead of "H"-opping over nothingness; WAVE CHANNEL CPU USAGE: - MANUAL wave instrument almost do no impact;
- ONCE/LOOP/PINGPONG do visibly more;
- KITS are heavy as long as they are playing;
- moving MODEs tax CPU more the lower SPEED parameter is;
- Interesting enough, high notes affect the CPU more than lower ones!
Most of the notes were taken during max tempo intense multi channel modulations,
leavning very little headroom before reaching "TOO BUSY!" state.
Once again, it's highly recommended to use GBC and GBA if available,
DMG brick cannot endure even half of what GBC can take.
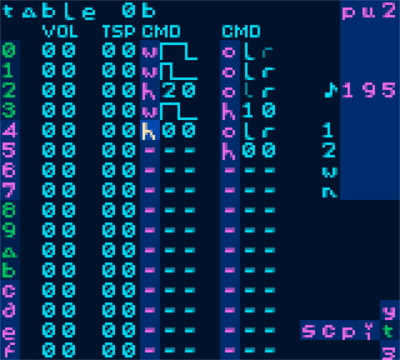
Commands below enable you to create extra hum sharing the channel you're using it on.
The length of the modulation will decide the pitch of the hum.
Minimal usable modulation is 2 step one, using O command as an example:
0 00 00 OLR
1 00 00 O--
2 00 00 H00
where modulation takes 2 steps, and on 3rd one we H-op to the beginning of our table.
it should look like on picture:

2 step modulation will decide the highest Hum pitch you can achieve using this tempo,
any longer modulation will decrease pitch by certain amount of semitones.
Now tune your "TEMPO" value for highest Hum pitch you want available,
and reach the other lower Hum notes using more steps in modulation, or by H1 command.
Use loops like "H10" and "H00" right below to achieve modulation in between rows, by rapidly switching between two steps.
It works only between first couple steps, trying to do that below 5step modulation
will be difficult to tune and can start to sound like an arp on lower TEMPOs

(picture showing 3 step H1 modulation)
Regardless of the tempo, relation between Hum notes stay same!
Table below represents part of usable Hum frequencies combinations you can use in table,
where step 0 is OLR, all next steps are O--
finishing with "H" 00 or 10 command.
| Modulation step | Semitones down |
|---|---|
| 2 step H0 | 0 |
| 2 step H1 | 4 |
| 3 step H0 | 7 |
| 3 step H1 | 9~10 |
| 4 step H0 | 12 |
| 4 step H1 | 14 |
| 5 step H0 | 16 |
| 5 step H1 | 17~18 |
| 6 step H0 | 19 |
| 7 step H0 | 21~22 |
| 8 step H0 | 24 |
| 9 step H0 | 26 |
| 10 step H0 | 28 |
| 11 step H0 | 29~30 |
Notice how 2,4,8step H0 share same note, but are lowered by an octave, as modulation is exactly /2 each time!
Some steps will sound more detuned than others, so make sure to tune your tempo accordingly
Note :Modulations like H2 will sound particulary distorted and off tune
For precise frequency of every step check out AM calculators available in this repository made by Lisa and Pator, props for their hard work!
"O" command generates hum idependently from the instrument's ADSR.
Note may be silent, but as long as instrument is still on, the hum will continue.
To enable, place "OLR" and "O--" commands in the table and loop them,
Can be stopped when you change instrument, "K" ill it or direct it to "A20".
Hum will even appear if you pan left or right side, creating stereo hum.
"O" command hum will duck in the volume if wave width is set to 75%, therefore works best with wave width 12.5%
The "O" command may be used on any channel you like.
One of the ways to control the hum's volume is to move around the steps where the "O" is active and where it's not.
Another way to look at the hum effect, think that every "OLR" step represents square wave at it's top,
and every "O--" is square at it's bottom.
Try mixing in active and panned notes in between to shape the Hum's pitch and timbre!

(Picture showing 4step H0 "W" table)
"W" command generates hum tied to instrument's ADSR.
If your note goes silent, the hum will go silent too.
To enable, place minimum 2 W commands of different width in the table and loop them,
Changing from thin to wide waveform will result in the loudest and grittiest hum.
Place more in between in various setups to alter the timbre and adjust the width to your liking.
"W" command also will produce high overtones that sounds like clicking!
"E" command generates hum overwriting instrument's ADSR.
To enable, place minimum 2 "E" commands of different volume in the table and loop them,
Hum will be louder as the distance between lowest and highest "E" command values rises.
Works best on the wave width 75%
Use "R00-0F" in phrase to retrigger the long hum tables,
giving you additional way to loop them without changing the table itself!
(Be careful, because it's more resource intensive to loop tables this way!)
First F digits of "R" commands will play the table up to chosen digit of the command
(i.e. "R04" will play first 4 steps of the table and hop back to the beginning)
Adjusting CMD rate of the instrument will make it work twicec slower per value
(i.e using CMD 1, command "R04" will behave like "R08")
Using the transpose column in the table with minimum 2 step modulation (just H itself) will split the instrument pitch into 3,
creating FM-like metallic sound.
3, because you have Transposed step next to another one (can be transposed or not) AND tempo dependant hum inbetween!
Using this on Noise channel can yeld new metalic pitch values this way!
LSDj allows the user to change the engine tempo on the fly using the "T" command.
This affects the entire sequencer, therefore affecting the overclock hum pitch.
The problem is that whole sequencer needs to be properly adjusted for this to work.
Though I haven't done it properly myself, I think that grooves will do the work correctly!
Because we are overclocking quite high,
I think we could accurately adjust groove to the song, or make it swing a bit but still fit the song.
I would recommend placing extra "G" commands before "T" in order to even out the tempo change,
(pre "T" groove with old and new groove timing for the smoothest effect -
placing new groove before/after tempo change can make song hiccup for a brief moment)
and put the new proper groove in all patterns when there's an empty space in the sequencer.
Twitter video of 3 tones singing from one Pulse channel
(picture above showing table used for first 4 notes in the Twitter video above)
Using combinations of "W" and "O" can yeld you multiple hums,
but beware that this technique makes the tuning even more difficult, and is extra taxing on the CPU.
Adding Transpose in the table adds ever more harmonics.
When using both "W" and "O" commands, try moving around commands so active "OLR" commands hit thinner waves if we want the hum to be quieter, or experiment with their placement for differences in timbre.
- Replace LSDj's hex value
3E04E007with3E07E007using hex editor, save - Turn on LSDj, put down one note in Pulse channel, press play
- Apply table to this instrument, place commands one under another "O
LR", "O--", "H00"
(just like "#Controlling the Extra Hum"" chapter picture) - Manipulate the tempo, and later the note itself, matching it to the hum (notice how they are separate sound sources, how they can phase);
- In instrument table move "H
00" one row lower (notice sound getting lower); - Replace those 2 "O" commands with "W", make them 2 different width;
- Again, play with the tempo, note and "H" placement in the table
- Adjust main groove to slow down sequence, place more notes,
- Copy the instrument and table, make second table have "H
00" placed in different spot, - Play those 2 instruments in 1 phrase (notice the hum changes when instruments/tables switch)
Check the table of Content on the top of the page and redirect yourself to chapter that interests you, or would answer questions you have regarding Overclocked LSDj!
Original guide from Pain Perdu only briefly described the WAV channel possibilities,
and in the beginning I was sceptical to even put much modulation there
because WAV channel is already powerful on its own, but here is something I discovered:
You can create "Distortion effect" on your kick with "O" Hum modulation,
(to preserve the "kick" part place think about placing the OC modulation lower in the Table,
i.e. make it 4 steps lower and loop it with H04)
while and on synths can help create acidy melody,
or just serving as another layer for your bass, choice is yours!
"O" plays with it's full loud potential when instrument finished playing in "ONCE" mode
(Newest LSDj turns off WAV channel once intrument finished playing, enabling Hum to continue on its own)
OR while SYNTH is playing make it louder when you turn WAV's volume down (like in pic above).
When Hum plays over your waveforms, it's gonna be the loudest where
distance between middle and top/bottom of the waveform is the greatest.
The smaller the waveform, the quieter the Hum.
All various ways to make sound in WAV channel tax the CPU differently,
I noted down what I have noticed in CPU usage!
Also thanks to the Overclock WAV instrument gets 4 additional faster SPEED values,
worth keeping in mind while designing our SYNTHs!
In original Pain Perdu's guide, the "Phase Bass" was first suggested SYNTH for the user,
all you need to do is to change Instrument mode to anything else than MANUAL,
and in the SYNTH menu set PHASE end (right side) to 1E,
then play around with it, experiment with expanded SPEED range!
Looking at it the other way, 1 row of the Table in stock LSDj is split into 4 in Overclocked version! Any modulation squished into those will let you achieve interesting results. At extremely high tempos its even more, so any commands you put there and loop it tightly with "H" commands will create an interesting result usually unique for Overclocked LSDj only!
This guide does not represent every single possibility, but tries to make known ways clear while engaging the exploration of sound design and pushing the limits!

(picture showing from left to right Stock LSDj, 4x, 8x, 16x playing sequence all in the same way)
As you already know, to achieve 4x overclock you need to find first string of hex values 3E04E007,
then change second value value 04 to 07. What if we tried other values?
Using 06 multiplies tempo by 8, and 5 by 16! This greatly expands the pitch range of possible hums,
but unfortunately the 8x version cannot reach even half of LSDj available tempo with 2step OHum
before reaching "TOO BUSY" state, and that's while using just 1 channel!
16x overclock version performs the poorest even on the lowest tempo, increased grooves, 2step 'O'Hum crashes Gameboy!
Though in theory they have greater potential than 4x overclock, their stability is almost nonexistant in current state.
Guide is being written while using LSDj 8.9.6 which may differ from future versions in some way, so I recommend to take a look at the changelog to see if there hasnt been any major changes!
Software Overclock technique works with all LSDj versions from 2.6.0 (included) all the way up to the latest one available. That said, this guide is written based on optimisations found in v8 and above allowing for comfortable and stable use - This means that any version below v8 won't perform well.
(This is version where I started using OC project!) Most noticeable difference is that WAV doesn't turn off compared to newer versions - which means no hum after instrument mode "ONCE" finishes playing.
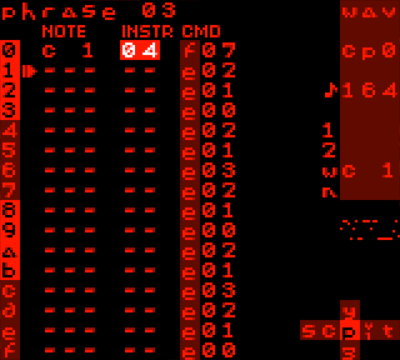
While using version 8.7.7 I noticed that the ADSR envelope tends to not be consistent - while it was sounding mostly correctly, on some chains like hihats or short pulse instruments placed one by one in a row, Lenght of each ADSR instrument "drifts" in relation to the engine's tempo.
To reproduce on LSDj (8.7.7):

- In Noise Channel create phrase with 16 steps of FD hihats
- Make ADSR for that instrument 61/00/--
- Set tempo to 195

The user might hear the ADSR getting slightly shorter or longer in a regular, LFO-like manner.
This behaviour is more noticeable when using the overclocked version.
This effect is mostly undesired and somewhat uncontrollable unless
the user tunes the TEMPO and starts the song at a very specific moment (Though extremely not recommended)
Version 8.8.0 and onwards keeps the envelopes very stable, and it's drift is not an issue anymore
Use version 8.8.7 if you wish to retain the old ADSR system, that is compatible with plenty of emulators and all Gameboy consoles.
- Asymmetric tables (to reuse OC Tables in other instruments)
- Even higher tempo limit (for higher pitch range of Hum)
- Separate engine speed from tempo, or per table
- CPU usage indicator
- Alternative way to obtain Hum, in maybe more precise ways?
- Integrate Overclocking feature into patcher, prevent patcher from changing the OC value (or ask to replace)
ABOC and Chiptune Cafe for being best Chiptune communities I know, motivated and supported me to finish this guide;
Pain Perdu for writing the initial Overclocking Guide for LSDj
Aquellex and DBOYD for direct help with the project
Lisa and Pator for coding their Overclocked Hum Pitch Finder programs and motivating me to finish this guide