.png)
.png)
.png)
.png)
.png)
.png)
.png)
.png)
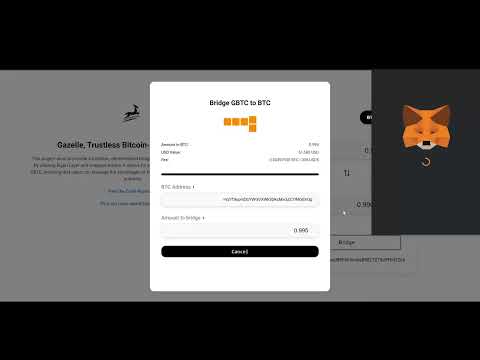
The user deposits the desired amount of BTC to the designated BTC multisig address on the Bitcoin network, controlled by the AVS operators. Upon transmitting the transaction, the user comes to the Gazelle App and inputs the desired ETH Mainnet destination address, the hash of the deposit transaction on the Bitcoin network, and the signature of the ETH destination address signed by the user's BTC private key. The operators, using Bitcoin light nodes, will check that the BTC transaction happened and upon reaching consensus, the AVS service will credit the user with the corresponding amount of Gazelle BTC (gBTC) ERC20 token on the ETH Mainnet minus the bridging fees, which are compensation for the operators and restakers. When the user wants to burn their gBTC and receive native BTC, the process is similar. First, the user inputs their desired BTC destination address and the amount of gBTC they want to bridge. Upon requesting the bridging, the gBTC is burned and the operators sign the transaction to release the BTC from the multisig. Upon consensus, the aggregated signatures and the transaction are broadcast to the BTC network, releasing the native BTC to the user. The balance changes of both the gBTC ERC20 and the native BTC can be observed in the user’s MetaMask wallet and the local BTC network instance used for testing purposes.
Do not use it in Production, testnet only.
We have used https://github.com/Layr-Labs/incredible-squaring-avs as the base for this project, the names of contracts,functions,... are still connected to that, but the functionality is a bridge between ETH and BTC
Transfer Bitcoin between Etherium and Bitcoin networks, trustlessly (still not production ready)
⚠️ Warning: The full system has only been tested on Windows
In order to test our integration with the Bitcoin blockchain, we have used the Bitcoin Core regtest node, that serves as an initial peer for our SPV Node, which is used to communicate with Bitcoin network.
Firstly, you need to download and install the Bitcoin Core Client. Run it and finish the initial configuration menu. Next, close the Bitcoin Core and modify the %appdata%/Bitcoin\bitcoin.conf file (or create it if it does not exist) to have the following content:
regtest=1
server=1
rpcuser=yourusername
rpcpassword=yourpassword
addresstype=legacy
changetype=legacy
txindex=1
rpcallowip=192.168.1.0/24 # Your local subnet
peerbloomfilters=1

[main]

[test]

[signet]

[regtest]

rpcbind=0.0.0.0
After you have modified the bitcoin.conf, save it, and open Bitcoin Core again. If everything is working fine, the Bitcoin logo should be blue on the loading screen.
Next, under File/Create Wallet, create a new Bitcoin wallet, and give it a name. Don't select any options and just click Create.
To get funds on the Bitcoin network, firstly, you will need to locate the location of the Bitcoin Core executable file. Navigate to the daemon folder with cmd, and enter the following command:
bitcoin-cli.exe -rpcwallet=YOUR_WALLET_NAME -generate 200
This will generate 200 blocks and give you some coins to spend.
Next, using your Bitcoin Core wallet, send some btc (the more the better) to mnJH8EX8efT3ci2myZf9shKbBUaiFaMxmW. Note that you will probably need to manually select the fees.
Run the following command to confirm that transaction (from Bitcoin Core daemon folder):
bitcoin-cli.exe -rpcwallet=YOUR_WALLET_NAME -generate 10
Run the bitcoinScripts/payment/sendMoney.js (first run npm i in bitcoinScripts folder). It will fund the hardcoded multisig with 1 BTC, which will give your SPV node (after you set it up) a transaction that you can test.
Finally, to set up the SPV node, navigate to the SPV folder in project root, and run the following commands:
git clone https://github.com/bcoin-org/bcoin
cd bcoin
npm rebuild
cd ..
npm install
Then, you should be able to run the SPV node by node app.js inside the SPV folder.
If everything is successful, you should see your transaction in the SPV/txs.json file.
You will need foundry and zap-pretty and docker to run the examples below.
curl -L https://foundry.paradigm.xyz | bash
foundryup
go install github.com/maoueh/zap-pretty@latest
You will also need to install docker, and build the contracts:
make build-contracts
You will need latest node
## Running via make

This simple session illustrates the basic flow of the AVS. The makefile commands are hardcoded for a single operator, but it's however easy to create new operator config files, and start more operators manually (see the actual commands that the makefile calls).

Start anvil in a separate terminal:

```bash
make start-anvil-chain-with-el-and-avs-deployed
The above command starts a local anvil chain from a saved state with eigenlayer and GBTC (incredible-squaring) contracts already deployed (but no operator registered).
Start the aggregator:
make start-aggregatorRegister the operator with eigenlayer and incredible-squaring, and then start the process:
make start-operatorBy default, the
start-operatorcommand will also setup the operator (seeregister_operator_on_startupflag inconfig-files/operator.anvil.yaml). To disable this, setregister_operator_on_startupto false, and runmake cli-setup-operatorbefore runningstart-operator.
Start the frontend app in the /bridge directory :
npm i
npm start

## Running via docker compose
We wrote a docker-compose.yml file to run and test everything on a single machine. It will start an anvil instance, loading a state where the eigenlayer and incredible-squaring contracts are deployed, start the aggregator, and finally one operator, along with prometheus and grafana servers. The grafana server will be available at http://localhost:3000, with user and password both set to admin. We have created a simple grafana dashboard which can be used as a starting example and expanded to include AVS specific metrics. The eigen metrics should not be added to this dashboard as they will be exposed on the main eigenlayer dashboard provided by the eigenlayer-cli.
The architecture of the AVS contains:
- Eigenlayer core contracts
- AVS contracts
- ServiceManager which will eventually contain slashing logic but for M2 is just a placeholder.
- TaskManager which contains task creation and task response logic.
- The challenge logic could be separated into its own contract, but we have decided to include it in the TaskManager for this simple task. It's not implemented in this project
- Set of registry contracts to manage operators opted in to this avs
- Task Generator
- The generator can be anyone, for this project, it's the React application at the bridge directory
- Aggregator
- aggregates BLS signatures from operators and posts the aggregated response to the task manager
- For this simple demo, the aggregator is not an operator, and thus does not need to register with eigenlayer or the AVS contract. It's IP address is simply hardcoded into the operators' config.
- Operators
- For mint tasks, they check weather the transaction happened on the BTC network via their local spv node, for burning, they sign the transaction and send it to the aggregator to aggregate those signatures and complete the multisig transfer

For this project, both mint and burn tasks are on the IncredibleSquaringTaskManager contract.
-
A task generator publishes tasks from the app to the IncredibleSquaringTaskManager contract's createNewTask function. Each task specifies a bool
isBurnTaskwhich specifies what should happen next (emit NewMintTaskCreated or lock GBTC and emmit NewBurnTaskCreated). Apart from that it sends both info for burn and mint tasks, only the info of the other is empty. For mint, the contract uses btcTxHash (hash of the compleated btc transaction) , mintTo(addres of the ETH account that you want the GBTC to be mintet to) ,signedMessage (mintTo signed by the users BTC private key, the one that they have sent the transaction with). For burn tasks, we send the ammount to burn and bitcoin destination address. -
A registry contract is deployed that allows any eigenlayer operator with at least 1 delegated mockerc20 token to opt-in to this AVS and also de-register from this AVS.
-
[Operator] The operators who are currently opted-in with the AVS need to read the task number from the Task contract, compute its square, sign on that computed result (over the BN254 curve) and send their taskResponse and signature to the aggregator.
-
[Aggregator] The aggregator collects the signatures from the operators and aggregates them using BLS aggregation. If any response passes the quorumThresholdPercentage set by the task generator when posting the task, the aggregator posts the aggregated response to the Task contract.
-
If a response was sent within the response window, we enter the [Dispute resolution] period. This functionality is not yet implemented
Every AVS node implementation is required to abide by the Eigenlayer AVS Node Specification. We suggest reading through the whole spec, including the keys management section, but the hard requirements are currently only to:
- implement the AVS Node API
- implement the eigen prometheus metrics
If you are using golang, you can use our metrics and nodeapi implementation in the eigensdk, just like this repo does. Otherwise, you will have to implement it on your own.
AVS Registry contracts have a stale view of operator shares in the delegation manager contract. In order to update their stake table, they need to periodically call the StakeRegistry.updateStakes() function. We are currently writing a cronjob binary to do this for you, will be open sourced soon!
See the integration tests README for more details.
When running on anvil, a typical log for the operator is
[2024-04-09 18:25:08.647 PDT] INFO (logging/zap_logger.go:49) rpc client is nil. Dialing aggregator rpc client
[2024-04-09 18:25:08.650 PDT] INFO (logging/zap_logger.go:49) Sending signed task response header to aggregator {"signedTaskResponse":"\u0026aggregator.SignedTaskResponse{TaskResponse:contractIncredibleSquaringTaskManager.IIncredibleSquaringTaskManagerTaskResponse{ReferenceTaskIndex:0x2, NumberSquared:4}, BlsSignature:bls.Signature{G1Point:(*bls.G1Point)(0x14000282068)}, OperatorId:[32]uint8{0xc4, 0xc2, 0x10, 0x30, 0xe, 0x28, 0xab, 0x4b, 0xa7, 0xb, 0x7f, 0xbb, 0xe, 0xfa, 0x55, 0x7d, 0x2a, 0x2a, 0x5f, 0x1f, 0xbf, 0xa6, 0xf8, 0x56, 0xe4, 0xcf, 0x3e, 0x9d, 0x76, 0x6a, 0x21, 0xdc}}"}
[2024-04-09 18:25:08.651 PDT] INFO (logging/zap_logger.go:49) Received error from aggregator {"err":"task 2 not initialized or already completed"}
[2024-04-09 18:25:08.651 PDT] INFO (logging/zap_logger.go:69) Retrying in 2 seconds
[2024-04-09 18:25:10.679 PDT] INFO (logging/zap_logger.go:49) Signed task response header accepted by aggregator. {"reply":false}
The error task 2 not initialized or already completed is expected behavior. This is because the aggregator needs to setup its data structures before it can accept responses. But on a local anvil setup, the operator had time to receive the websocket event for the new task, square the number, sign the response, and send it to the aggregator process before the aggregator has finalized its setup. Hence, the operator retries sending the response 2 seconds later and it is accepted.