UserManual
User Manual
Paco is an open-source platform for behavioral research. It includes a web interface and mobile apps (Android, iOS). Since the Paco app travels with participants throughout the day on their smartphones, it can operate at meaningful moments to log data and/or prompt users to act (e.g., view information, answer research questions, etc.). This makes Paco well-suited for:
-
Daily experience research, to study participants’ attitudes and behaviors over time, in the context of their daily lives (e.g., for user-centered design of products or services).
-
Behavior-based interventions, to make participants more aware of their behaviors throughout the day and/or take action as a result.
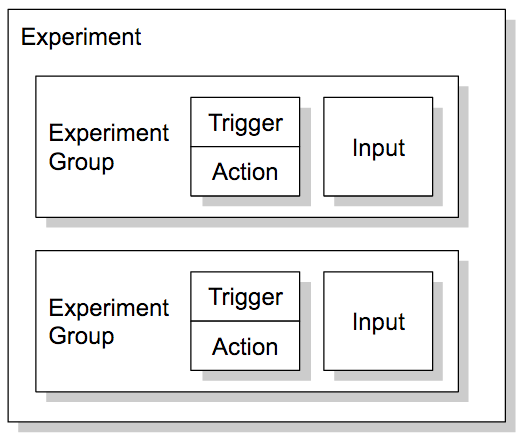
Within Paco, you create experiment****s. Experiments are made up of 1 or more triggers and actions--triggers tell Paco when to take action. Often, the desired action is to prompt participants to answer a set of questions, called inputs. Experiments can also have multiple experiment groups, which allows you to include several sets of inputs within the same experiment. This structure allows you to adjust the complexity of your Paco study to meet your needs.
You create an experiment using Paco’s web interface and then publish the experiment to a published audience, who will receive an invitation to join your experiment via the Paco app. You can also monitor responses and download data via the web interface.
Due to platform limitations, experiments developed for iOS will not have access to all of the same capabilities as those developed for Android. The web interface uses the icon below to identify features that are not supported on iOS.

-
Sign into Paco by following the link: https://www.pacoapp.com
-
Create a new experiment by clicking on "New Experiment".
-
Review and/or fill in the information in each of the 5 tabs:
-
Basics - define the information potential participants will see when browsing for or joining your experiment.
-
Groups - define your experiment by creating triggers, actions, and inputs (more info).
-
Admin - control who has access to edit, join, and view the full results of your experiment (more info).
-
Source - edit the JSON source code for your experiment, which may be useful for debugging or advanced customization.
-
Preview - preview the input form(s) that you created on the "Groups" tab. NOTE: Android and iOS rendering is different, so it’s best to also preview your experiments on each app.
-
-
Save the experiment by clicking on "Save Changes." NOTE: You may “Discard Changes” between saves, but there is currently no way to undo individual changes.
-
Test the experiment on the Paco app. We recommend that you try the experiment first, then test with a small group of trusted participants before publishing to a broader audience. Paco allows rapid creation and iteration on your experiment.
Experiments in Paco are made up of 1 or more experiment groups that contain triggers, actions, and inputs, as shown below. This structure allows you to adjust the complexity of your Paco study to meet your needs.
Triggers and actions are at the core of most experiments. Triggers define the meaningful moments when the Paco app should take action. These moments are meaningful when they map to real-world behaviors of interest.
There are 2 main types of triggers--schedule triggers and event triggers--that you can mix-and-match within an experiment.
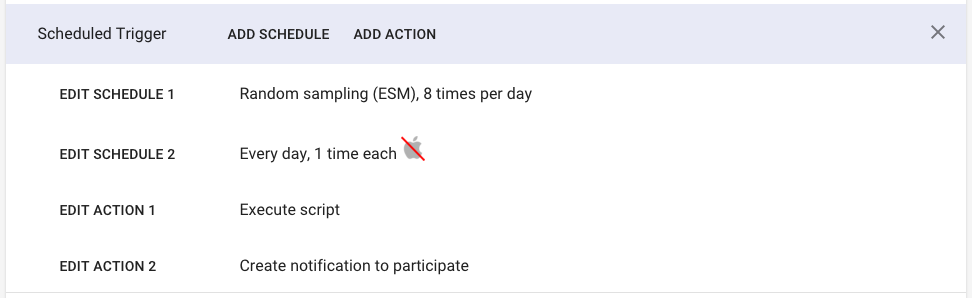
Within each type of trigger, you can add multiple schedules/cues and multiple actions. In these cases, Paco will execute the actions in sequence whenever any of the triggers in the group occur. In the example below, Paco will execute a custom script (action 1) and then prompt participants to answer questions (action 2) randomly throughout the day (schedule 1) as well as every evening (schedule 2).
With Schedule Triggers, Paco takes action according to a predefined schedule (e.g., daily, weekly, monthly). This is useful when you expect a behavior of interest to occur at a regular frequency (e.g., breakfast, sleeping, morning commute, etc.).
Checking "User editable" allows participants to edit schedule triggers to better match their daily lives (e.g., “morning commute” may mean 6am for some or 10am for others). If editable, it’s helpful to add labels to each schedule time to communicate to participants the intended behavior of interest.
Random Triggers are a special subset of scheduled triggers in which Paco takes action at random times within a predefined time range. This is useful for behaviors that occur throughout the day (e.g., working) or according to unpredictable schedules (e.g., sending emails). Random triggers are a key part of experiential sampling methodology (ESM) studies.
With Event Triggers,** **Paco takes action in response to a predefined event called a cue. This is useful when real-world behaviors map to smartphone actions that Paco can detect (e.g., opening the Uber app as a signal that one is about to commute).
Paco supports a growing list of cues that allow triggering in response to phone calls, media, apps starting/stopping, and participation actions. The "App started" cue triggers when an app gains foreground (i.e., becomes visible on-screen), and the “App stopped” cue triggers when an app loses foreground (i.e., no longer visible). You’ll need to specify the full activity name of the app when using the app started/stopped cues, which you can find by creating an app logging experiment.
Paco takes action in response to triggers. Paco allows 3 actions:
-
"Create a notification to participate" - prompt participants to answer inputs (i.e., take a survey).
-
"Create notification message" - show participants a custom message.
-
"Execute script" - run a custom script to produce complex interactions.
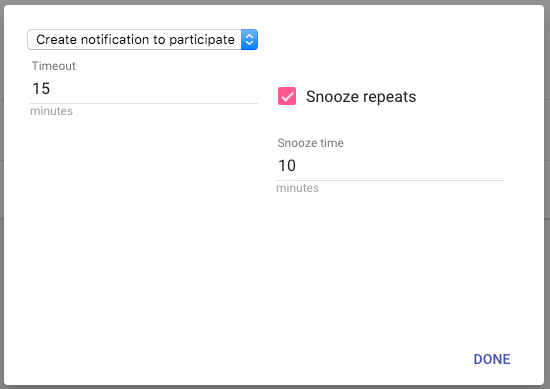
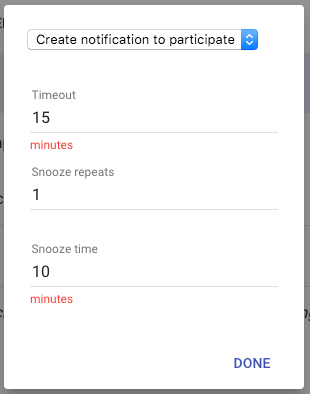
You can set message and prompt actions to disappear after a timeout, which may be useful if you want to ensure that participants only respond at the meaningful moments you’ve defined. If participants don’t respond within the timeout, it will count as a missed signal in the data. You can also remind participants to respond by setting a snooze repeat, which will re-signal a set time (i.e., the **_snooze time) _**after the initial signal (currently, only once). In the example below, participants will have 15 minutes to answer survey questions, and they will be reminded 5 minutes before it’s counted as a missed signal. Note that participants also have the option to self-report whenever they want via the Paco app.
Inputs are survey-style questions for participants to answer. A group of inputs is called an input form. Your experiment may have many inputs and input forms or none at all. Each input must have a variable name, which is used to identify the data for that input in the dataset, or as part of conditional logic. Variable names are case-sensitive and cannot contain spaces.
Advanced users may be interested in the "Override form display" option (located under the “Advanced” section). This allows you to replace the survey-style input form with custom HTML and Javascript, enabling sophisticated experiments (e.g., that read in and respond to sensor data, or that use complex conditional logic to decide which questions to show).
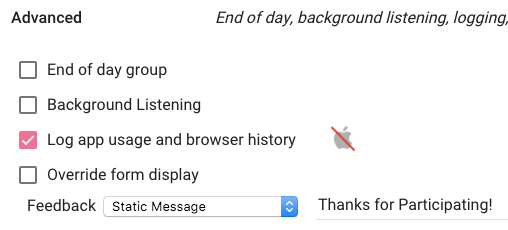
You can customize what participants see after submitting responses to an input form by changing the "Feedback" option (located under the “Advanced” section):
-
Static message - shows your own message along with a link for a participant to view their raw data.
-
Custom code - allows you to provide your own HTML and Javascript for sophisticated feedback.
-
Disable feedback - does not display any feedback after a participant submits an input form; this is used when the override form will handle displaying feedback.
-
Retrospective - provides a participant’s last responses with links to charts of their full response set (not implemented yet; will be Android only)
-
Responsive - not yet implemented.
More generally, Paco has advanced features to collect data from a participant’s phone (e.g., make/model, app usage, etc.) or from external sensors that send data to a participant’s phone (e.g., Jawbone band).
Your experiment can have multiple experiment groups that allow you to use multiple input forms within the same experiment. This is useful, for example, if you want to ask different questions based on different triggers (e.g., one set of questions during the day and another set of questions at the end of the day). Each experiment group can only have one input form.
Paco can collect several kinds of data beyond answers to survey questions. These options are listed under the "Advanced" section of the “Groups” tab:
- **End of day group - **allows you to reference the responses submitted to one experiment group (called the "referred group") by another experiment group. This is most commonly used for end-of-day surveys to prompt participants to review their responses submitted throughout the day and provide an opportunity to add more detail or ask follow-up questions about each submitted response. Here’s an example of what participants would see when answering end-of-day group questions (daily responses are in the shaded area and end-of-day questions are in the white area below). Learn more about how to implement this feature.
-
Background listening -** **allows Paco to constantly listen for and log data sent from another app (e.g., log step data sent by a fitness tracker). This often requires engineering effort to add code to an app to send data to Paco (learn how).
-
Log app usage and browser history** - **allows Paco to constantly log apps opened and sites visited. If used, this permission will automatically be added to the informed consent form, and participants must accept this permission to join your experiment (i.e., they cannot opt out). Not all Android devices support this feature (learn more).
-
Phone details - allows Paco to log the make, model, carrier, Android version, and screen size of a participant’s phone when they join the experiment. This option is located on the "Admin" tab. If selected, participants must accept this permission to join the experiment (i.e., they cannot opt out).
It’s also possible to collect the following data using the custom code (i.e., via the "Execute script" option for actions, “Custom code” option for feedback, or “Override form display” option):
-
Location information
-
Phone details
-
Apps installed on the phone
If your experiment implements code to collect this data, you should inform participants by checking the appropriate options under "Extra Types of Data Collection" section on the “Admin” tab. See an example experiment using custom code.
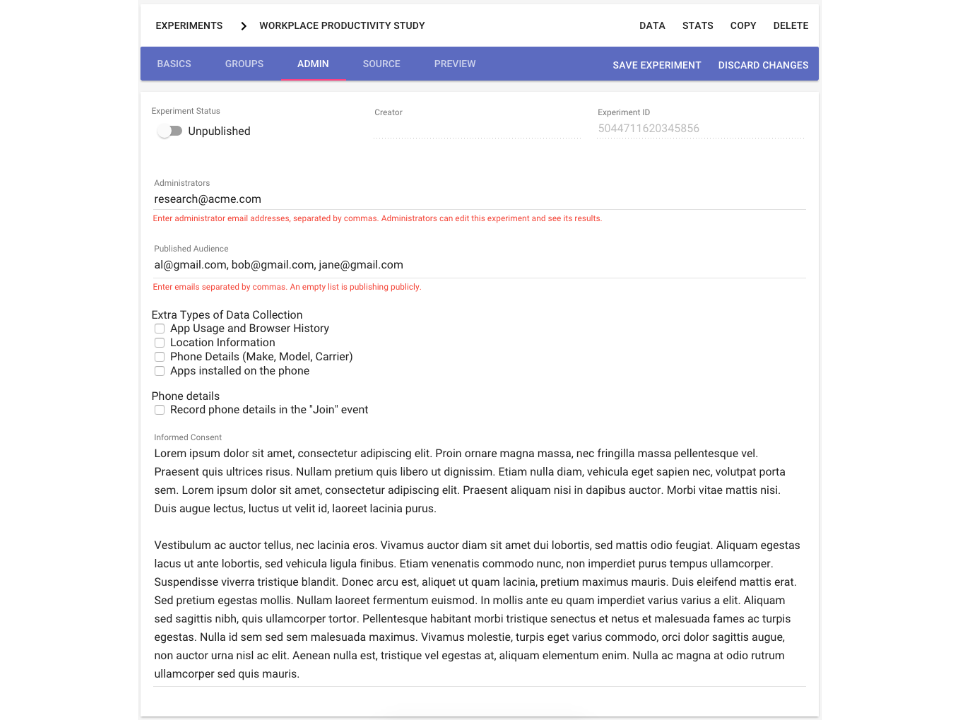
An experiment’s "Admin" tab allows you to control who has access to edit, join, and view the data from your experiment.
Administrators always have access to edit or join an experiment and view all of its data. You may also publish your experiment to a published audience or to all Paco users:
-
**Published audience - **participants whose emails are listed under the "Published Audience" field will receive an invitation to join when they open the Paco app. The emails must be @gmail, @google, or at another Google-administered domain.
-
**All Paco users - **by leaving the "Published Audience" field empty when you publish your experiment, all Paco users can find and join your experiment by searching within the “Experiment Hub” on the Paco app. However, they will not receive invitations.
NOTES:
- The "Published Audience" field should only contain plain, lowercase email addresses separated by commas:
Correct: johndoe@google.com, jane@gmail.com
Incorrect: John Doe JohnDoe@gmail.com, Jane Doe jane@hotmail.com
-
@google participants who use a Work Profile in Android will have difficulty joining Paco experiments (since Paco currently does not support Work Profiles). We recommend inviting these participants using their personal email address.
-
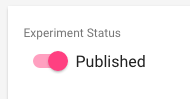
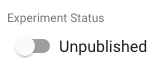
Simply adding emails to the "Published Audience" field does not automatically give these participants access! You must also toggle the “Experiment Status” to published and save the experiment.

-
Once published, access to an experiment is immediate. However, the duration of an experiment (set on the "Groups" tab) controls when the experiment starts and stops pinging the participants who have joined. Setting duration to fixed with a later start date may be useful for onboarding participants to Paco (i.e., allowing them to install Paco and join the experiment) prior to actually starting the experiment. Not seeing an experiment invitation? Try these troubleshooting steps.
-
IMPORTANT: Removing participants from the published audience, or unpublishing the experiment, will not remove access for participants who have already joined. Participants who have joined experiments have access to them until the experiment ends, or until they decide to leave the experiment through the Paco app.
-
There is a known issue that occurs if you try to unpublish an experiment with many participants. You’ll receive a "operating on too many entity groups in a single transaction" error. The workaround is to remove a few participants at a time, saving in between, before unpublishing.
Ethical research on humans requires that researchers provide participants with enough information to enable them to make an informed, voluntary, and rational decision to participate.
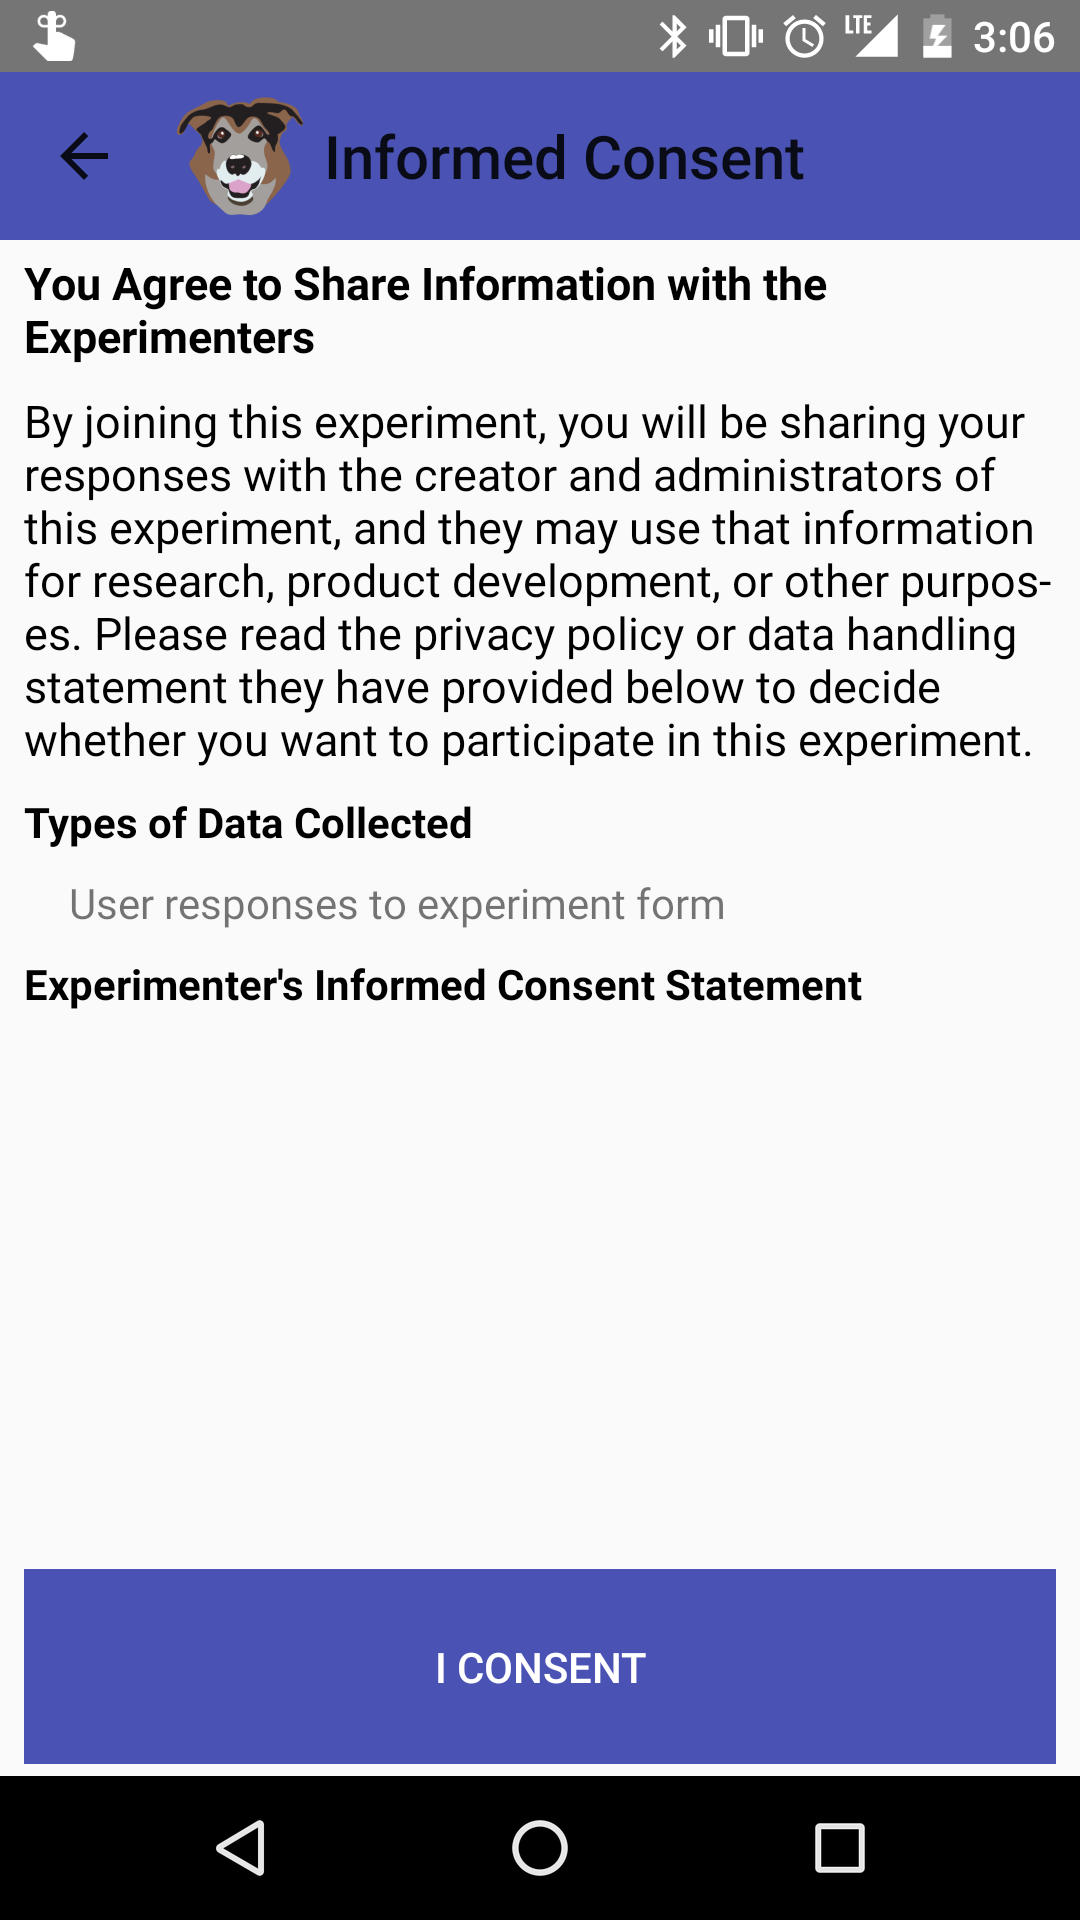
All Paco experiments include an informed consent screen as part of the participant join flow. This screen includes boilerplate consent information (not editable), lists the types of data collected by the experiment, and includes space for your own informed consent information. Paste your informed consent information into the "Informed Consent" field on the “Admin” tab.
One way to share your study with others is to recruit a "convenience sample." You can do so by publishing your study publically to the few thousand users who have Paco installed on their phones. These users will not receive an invitation, but can discover your study by visiting the “Experiment Hub” in the Paco app. This approach may be useful for studies that don’t target particular types of users and don’t have time constraints, since it is difficult to predict who will discover your study and when they will join.
If you want to ensure that participants have certain characteristics and participate within a specific time period, you’ll need to screen and recruit your own participants. Depending on your needs, you may consider recruiting friends or colleagues, screening and recruiting people from sites like Craigslist, or engaging a professional recruiting vendor.
As a rule of thumb, screening, recruiting, and onboarding participants can take up to 2 weeks.
To participate in a Paco study, participants must install the Paco app and join your experiment. Below are template instructions that you can share with participants:
Please be sure to copy these templates and adjust them for your needs.
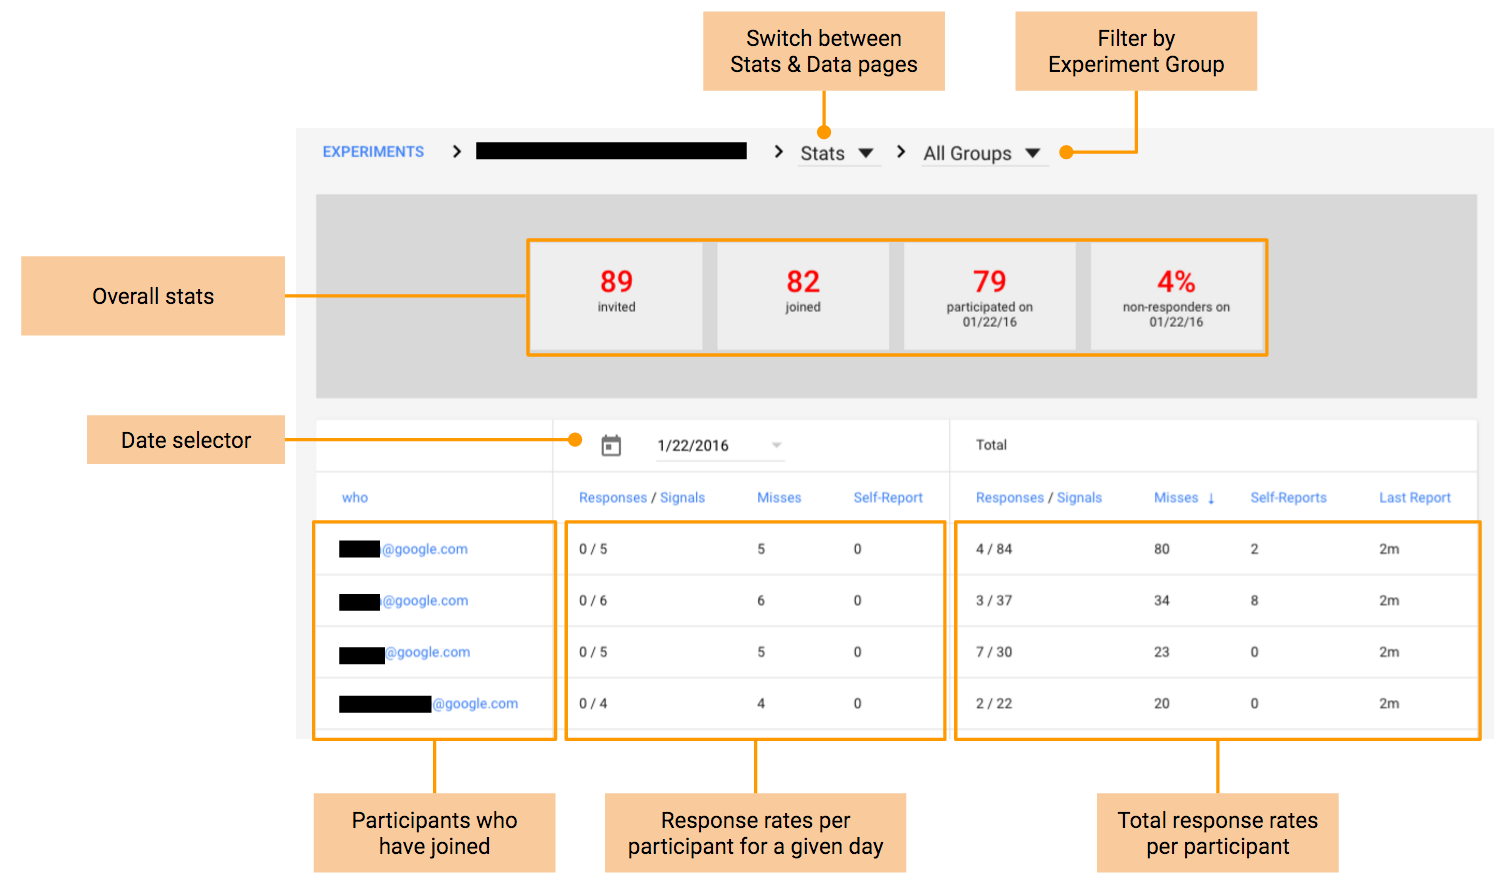
An experiment’s Stats page allows you to check during a study that participants are providing the quantity and quality of data that you expect (view larger image).
From the Stats page, you can:
- Check that everyone’s joined: From the overall stats at the top of the page, you can compare the number of invited participants to the number joined. To identify participants that haven’t joined, compare the list of emails below with the experiment’s Published Audience. You can then follow up with those participants to help them join your study if they still wish to participate.
NOTE: If you don’t see a participant on the Stats page, check the "joined" column on the Data page. It’s possible that they have joined recently and have not yet had an opportunity to provide data (in which case they would not yet appear under Stats).
-
Check overall response rates (per day or per group)****: From the overall stats, check the percentage of non-responders for a given day, which includes all participants who have not responded to signals (pings) that day (does not consider self-reports). Ideally, this number should stay below 10%. If your experiment has multiple groups, you can also filter overall response rate by group from the pulldown above the overall stats.
-
Identify low-responders: The table below overall stats shows response rates for each participant in your study for a given day and overall. You can click on each column heading to sort. Sorting by Total Misses is a good way to identify chronic non-responders that you may need to follow-up with to determine if they’re having technical or other difficulties.
-
Check individual participation rates**:** Clicking on an individual email allows you to drill into daily response rates for a particular participant. This provides overall response rates for that participant and can also help identify response patterns. For example, if a participant has never responded, they may not be receiving pings; if they’ve only stopped responding recently, it could just be a syncing issue.
-
Check responses: At any point, you can switch from the Stats page to the Data page to see responses overall, per group, or per participant. This helps you to check the quality of responses as they are submitted to determine if you need to provide additional guidance. You can also export the data submitted so far to compute stats or get a head-start on analysis.
We recommend checking the Stats and Data pages periodically throughout your study, particularly in the beginning and throughout long (>1 week) studies.
- Navigate to your experiment’s Data page (e.g., from your Experiments page, click on "View Data" for your experiment).

- Click on "Report Options" at the bottom of the page.

- Select your preferred report format and click on "Generate Report." You can also anonymize the report (i.e., encode participant emails) from the popup.
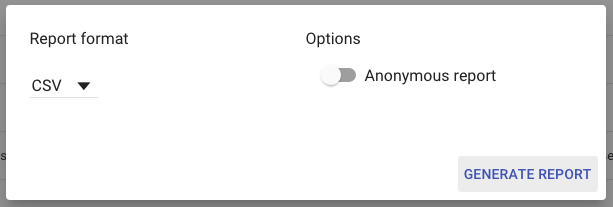
- Click on "Download" at the bottom of the Data page to download your report.

Analysis of results from Paco studies varies as widely as the studies themselves. Detailed recommendations are beyond the scope of this document, but here are some potentially helpful tips:
-
Save time for analysis! The amount of data can grow quickly, particularly with app logging or app triggered studies.
-
You may need to clean the data before analysis. For example, for list questions, Paco outputs the index of the selected choice, rather than the choice itself. You can use find-replace or LOOKUP functions to swap these, and then IF statements to move choices into their own columns.
-
You may want to categorize open text responses to make them easier to analyze. Searching responses for keywords can be a good way to speed up this process.
-
Descriptive statistics can be helpful to summarize closed-ended questions and categorized open-text responses.
-
Times are reported in the participant’s local timezone (or at least the timezone that the participant’s phone was set to).
If your participants report that they’re not receiving any pings from Paco, there are a couple likely causes:
-
The participant cannot or has not joined your experiment
-
The participant is not noticing the pings and/or is not doing anything to cue the pings (if they are event-triggered)
First, check these possible causes for why a participant cannot or has not joined your experiment:
- Is the experiment published? Check your experiment’s Admin tab. Only administrators can join an experiment that is unpublished.

- Is the participant’s Google-managed email address listed under Published Audience? Is it spelled correctly? Is the format of the email addresses correct? Unless you intend to make your experiment publically-accessible, you need to list each participant’s Google-managed email address (e.g., @google.com, @gmail.com, etc.) in the "Published Audience" field. Note that the list should only contain plain email addresses separated by commas:
-
Correct: johndoe@google.com, jane@gmail.com
-
Incorrect: John Doe johndoe@gmail.com, Jane Doe jane@hotmail.com
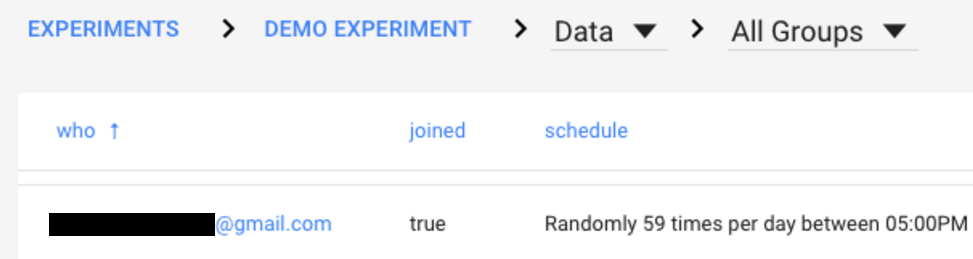
- Has the participant joined the experiment? Check your experiment’s Data page. If they joined, you should see "true" in the “joined” column next to their email.
If their email is not listed, there could be a few causes:
1. **(Most likely) Is the participant signed into Paco using the same Google account as listed under the Published Audience?** Have the participant follow these instructions ([Android](https://docs.google.com/presentation/d/1rD79tXSpmA7BdfFSrRkelkqOeJPnd6x5pBKb5iSyRes/edit#slide=id.g11b643e694_0_475), [iOS](https://docs.google.com/presentation/d/1Z0ODVz6NqbxhAvoZDQznmI--gi3j5NNx-FmZ8d559sw/edit#slide=id.g11b636f82f_0_569)) to check which account they’re using. Then they can either switch accounts, or you can add the account they’re currently signed into to the Published Audience. If the participant is using a Work Profile in Android (currently not supported by Paco), you’ll need to take the latter approach--i.e., add their personal email address to the Published Audience instead of their (@google) work email address.

2. **Did the participant notice the experiment invitation?** Have them repeat the instructions ([Android](https://docs.google.com/presentation/d/1rD79tXSpmA7BdfFSrRkelkqOeJPnd6x5pBKb5iSyRes/edit#slide=id.g11b643e694_0_118), [iOS](https://docs.google.com/presentation/d/1Z0ODVz6NqbxhAvoZDQznmI--gi3j5NNx-FmZ8d559sw/edit#slide=id.g11b636f82f_0_223)) for checking their invitations and joining an experiment.

3. **(Less likely) Is the participant not connected to the internet, preventing Paco from downloading their experiment to join?** Have the participant follow these instructions ([Android](https://docs.google.com/presentation/d/1rD79tXSpmA7BdfFSrRkelkqOeJPnd6x5pBKb5iSyRes/edit#slide=id.g11b643e694_0_504), [iOS](https://docs.google.com/presentation/d/1Z0ODVz6NqbxhAvoZDQznmI--gi3j5NNx-FmZ8d559sw/edit#slide=id.g11b636f82f_0_616)) to check Paco’s internet connection.
If the instructions above don’t solve the problem, check for these signs and symptoms that a participant is missing pings:
-
**Has the experiment started? Is the experiment over? **Check the "Duration" on your experiment’s Groups tab. If you’re using a fixed duration, Paco will not ping participants outside of this window. Also, participants cannot join a fixed duration experiment after it has ended.
-
**Has the participant submitted any data yet? **Click on the participant’s email address on the Stats page. Their total "Response / Signal Ratio" and total “Self-Report Count” will indicate whether or not they are missing pings. Interpreting their participation will depend on if your experiment has schedule or event triggers:
-
Experiments with schedule triggers should have a response count that is, ideally, close to the signal count. If participants are missing >25% of signals, they’re likely not participating correctly. You’ll need to remind them how to participate (Android, iOS).
-
Experiments with event triggers should have a non-zero (often large) self-report count. If there are no self-reports, the participant has likely not allowed Paco to detect the cues you set. You should remind participants to enable app logging (Android).
-
In either case, if there is some data but you’re missing recent data, the participant may have poor internet connectivity, preventing Paco from uploading their responses.
-
-
Does the participant’s schedule make sense? If you’ve allowed participants to edit the schedule, they may have selected a schedule that is too compressed or at obscure times (less likely). Scan the "schedule" column on your participant’s Data page for changes. If appropriate, suggest that the participant adjust the schedule using the following instructions (Android, iOS).
If none of the above solve the problem, ask the participants to run a Troubleshooting report(Android, iOS) to send to you, then forward to paco-support@googlegroups.com for the Paco team to troubleshoot.
If you have some data for a participant but expect more data, check these likely causes:
-
**Are all of the emails in the Published Audience lowercase? **We recently learned that mixed-case emails (e.g., JohnDoe@gmail.com vs. johndoe@gmail.com) will allow participants to join but prevent the Paco app from uploading their data to Paco’s servers. To correct, simply change all emails in the Published List to lowercase and save.
-
Is the participant not connected to the internet, preventing Paco from uploading their data? Have the participant follow these instructions (Android, iOS) to check Paco’s internet connection. Their data will be stored on their phone until they’re reconnected.
-
Is the participant participating correctly? They may be missing pings, not submitting their answers, or forgetting to tap Done to save their open-text responses (on iOS). You’ll need to remind them how to participate (Android, iOS).
If none of the above solve the problem, ask the participants to download a debug log (Android, iOS) to send to you, then forward to paco-support@googlegroups.com for the Paco team to troubleshoot.
TBD.
Yes, participants need to have an @gmail or Google-hosted email address. Having Google handle authentication provides security while also allowing the Paco team to focus development on Paco’s core functionality to enable behavior research innovation.
No, Paco’s memory usage is minimal (typically less than 5MB).
Data usage is also minimal, though this varies based on the type of study. For reference, a week-long ESM survey typically only uses a couple MB of data. However, a study involving photos may require up to 1 MB per photo.
Best practices - TBD. Ping frequency, app logging.
-
Account for typical 12-15% drop off rate.
-
Avg. 72% response rate, even for studies as long as 30 days, 5 times per day.
Modifying an experiment after participants join is not ideal. It’s important to pilot your experiments before publishing them to your intended participants to iron out any bugs early.
That said, it is possible to update your experiment’s inputs (questions) after they’ve been published. You’ll first need to make the changes on the web interface and save them. Then you’ll need to request that participants refresh their experiments list in the Paco app to download your updated experiment. Participants will then be able to continue participation as usual. We’ve created instruction templates (Android, iOS) that you can share with your participants.
IMPORTANT: If you’ve allowed participants to edit schedule triggers, it will be more difficult to change the schedule in the field. This is because Paco assumes that participants will customize their scheduled trigger times and it respects their choices; therefore, Paco will not allow you to overwrite a participant’s schedule. In order to change a schedule in the field if your scheduled trigger times are user-editable, you’ll need to ask participants to stop and then re-join your experiment. We’ve created instruction templates (Android, iOS) that you can share with your participants.
Due to platform limitations, experiments developed for iOS will not have access to all of the same capabilities as those developed for Android. The web interface uses the icon below to identify features that are not supported on iOS.

The features currently not supported on iOS include:
-
End of day groups
-
Background listening
-
Override form display
-
App logging, app triggering
Due to device limitations, some Android phone models will not support experiments that would normally work on stock Android phones. Here’s a list of known issues:
- LG series phones (G2 onward) do not support app logging or app triggering.
Yes! While not specifically formatted for tablets, the Paco app works just fine on them.
Paco allows you to make the presentation of certain inputs dependent upon participants’ responses to previous inputs. Paco currently only supports conditional logic for closed-ended questions (i.e., scale, smiley scale, or list types). When you check the "Conditional" box on the dependent input, you will see a “Condition” field appear. This field takes arguments made from the following 3 basic terms:
-
**Independent variable name **(Note: no hyphens "-")
-
Comparison or logical operator** - **Paco supports the following:
| && | and |
| || | or |
| == | equals |
| < | less than |
| > | greater than |
| <= | less than or equals |
| >= | greater than or equals |
| != | not equal |
- **Condition - **the condition upon which the conditional logic is based. This will be the index of the desired closed-choice inputs, starting at 1.
Paco currently supports multiple arguments read from left-to-right. Paco does not currently support nested logic using parenthesis.
Examples:
- Display the conditional question if the participant selects the 5th option for question 1 (assuming the input variable name for question 1 is "question1"):

- Display the conditional question if the participant selects any option other than the first option for question 1 and does not select the first option for question 2 (assuming the input variable name for question 1 is "question1" and “question2” for question 2):

You can test your conditional logic using the Preview tab. It’s also best to test your questions on each platform (Android, iOS, web) that you intend to run you study on, since questions may render slightly differently on each platform.
Paco does not currently support this feature within a single input. The best approach is to add a follow-up open text question that is conditional on the participant selecting "other" from the previous multiple-choice question.
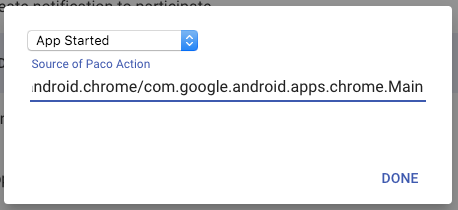
You’ll want to create an event trigger in your experiment, and select either the "App Started" or “App Stopped” cue. The easiest way to find the source for this cue is to record it by creating your own app logging experiment, as follows:
NOTE: Activity names may differ for different versions of apps or on different phones. We recommend testing your app triggering experiment on a sample of phones that you expect participants to have and/or consulting with the app’s developers if possible.
- Sign into pacoapp.com, then click here to join our pre-made app logging experiment (you may need to clear your cookies if it doesn’t work the first time).
Or, if you prefer, create a new app logging experiment from scratch:
1. From the web interface, navigate to "Experiments" and click “New Experiment.”

2. On the "Basics" tab, give your experiment a memorable title.

3. On the "Groups" tab, ensure that “Log app usage and browser history” is checked.
4. On the "Admin" tab, ensure that the account associated with your Paco app can [access this experiment](#heading=h.abr4ps7v83qm).

5. Click "Save Experiment" to save your new experiment.
-
Open the Paco Android app. You should see an invitation to join your app logging experiment. If not, navigate to "My Experiment Invitations" from the menu.
-
Tap on your app logging experiment and complete the join flow.
-
On Lollipop or greater, you’ll need to also ensure that Paco has permission to view your app usage:
-
Open the Settings app.
-
Navigate to "Security."
-
Tap on "Apps with usage access" (at the bottom)
-
Set Paco’s access to "On." Paco will begin logging app usage after your phone screen turns off and back on once.
-
-
Open and/or close all of the apps that you’re interested in triggering on. Try different ways to get into them, since some apps have different entry points (e.g., opening Gmail via the icon vs. opening Gmail from a mail notification).
-
Back on the web interface, view the data from your app logging experiment. Copy each of the items under the "apps_used_raw" column associated with the apps you want to trigger on.
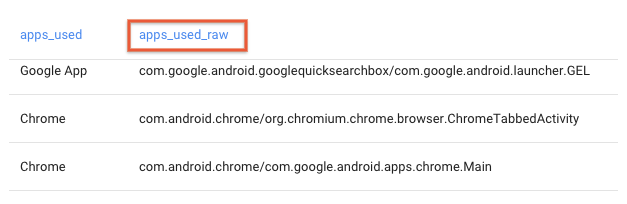
-
In your original experiment, add cues for each distinct activity and paste the activity name into the "Source of Paco action" field.
Unfortunately, the Paco team has limited bandwidth for user support. If you cannot find answers to your questions in this document**, **please email paco-users@googlegroups.com. Note that it may take a few days for the team to respond.
The following sections describe basic experiments that you can use as templates for your own studies.
Let’s imagine that you want to study workplace productivity. This is an activity that occurs throughout the day, so this study is a good candidate for ESM.
The following steps will create an ESM study that asks participants to rate their productivity in the moment at 3 random times during the workday for 7 days.
-
Sign into PACO (pacoapp.com) and create a new experiment.
-
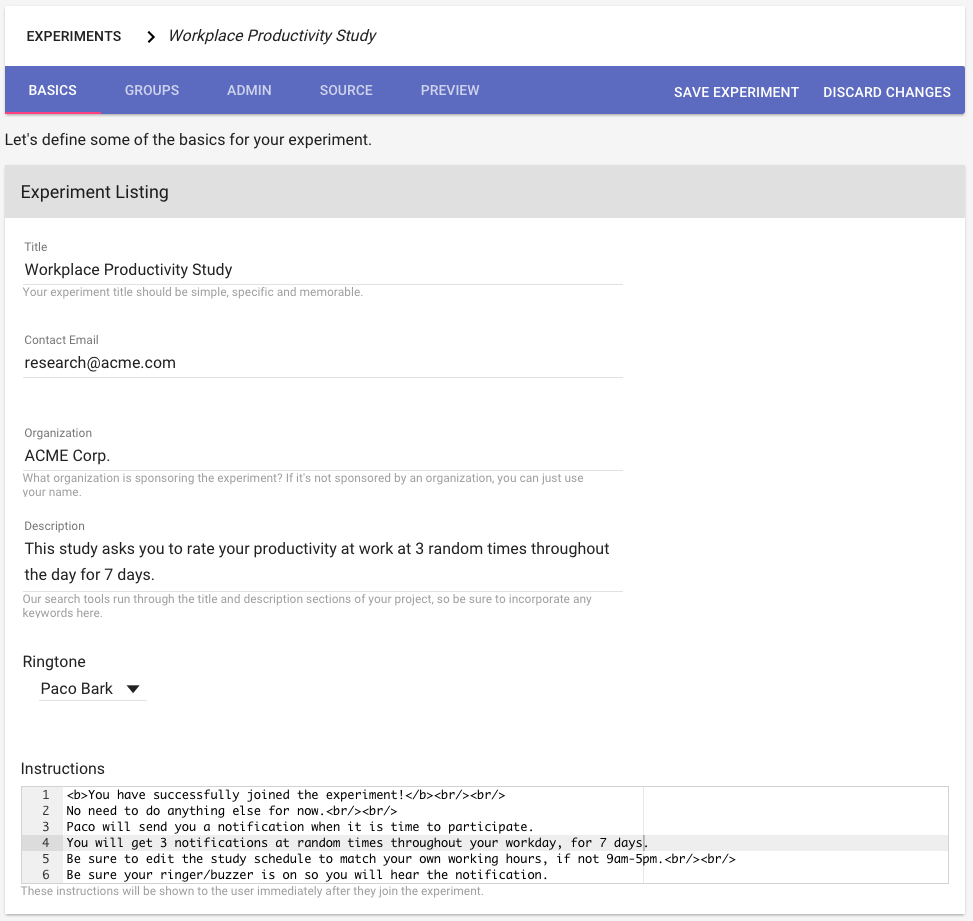
Fill in the information on the "Basics" tab. You may want to update the instructions to remind participants about to what to expect during the study.
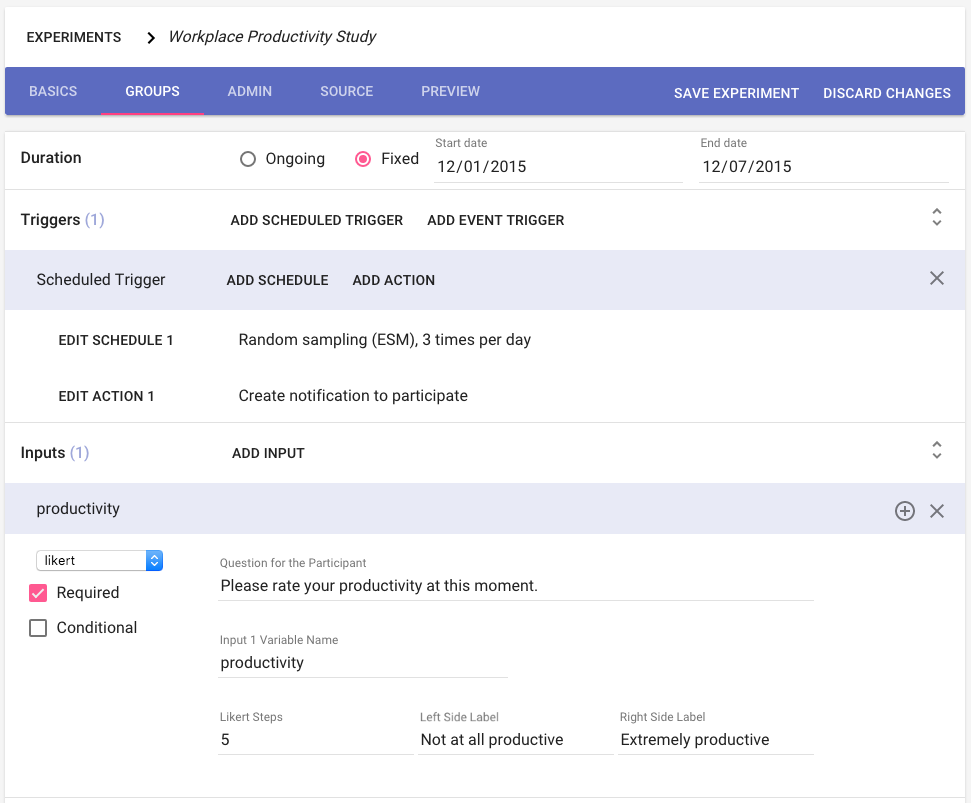
- On the "Groups" tab, update the duration to span 7 days.

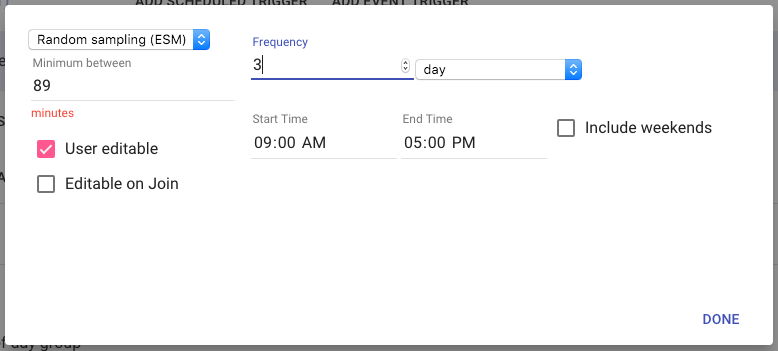
- Add a scheduled trigger and then edit the schedule to match our desired ESM schedule. In this case, we’ve decided to ping, at most, every 90 minutes. We’ve also omitted weekends (assuming Mon-Fri work weeks) and allowed participants to edit the start and end times (in case their working hours differ from 9am-5pm).
- Now edit the action that Paco takes at each scheduled trigger. In this case, we want to notify participants to participate to answer our survey question (inputs). We’ll give them 15 minutes before we decide that they haven’t responded quickly enough, and we’ll remind them once 10 minutes after the initial notification (i.e., 5 minutes before timeout).
*
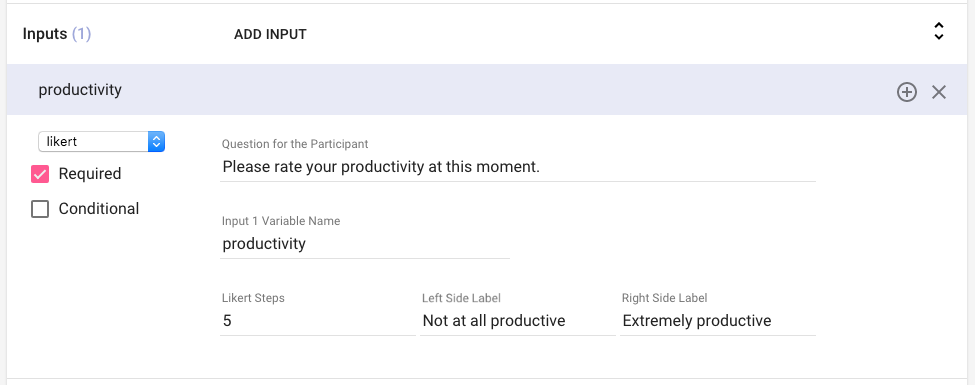
- Add an input. In this case, it’s just 1 required, likert-scale question. Note that we added a variable name, which is required.
- Review the "Groups" tab before moving on. We haven’t used any of the options in the “Advanced” subsection.
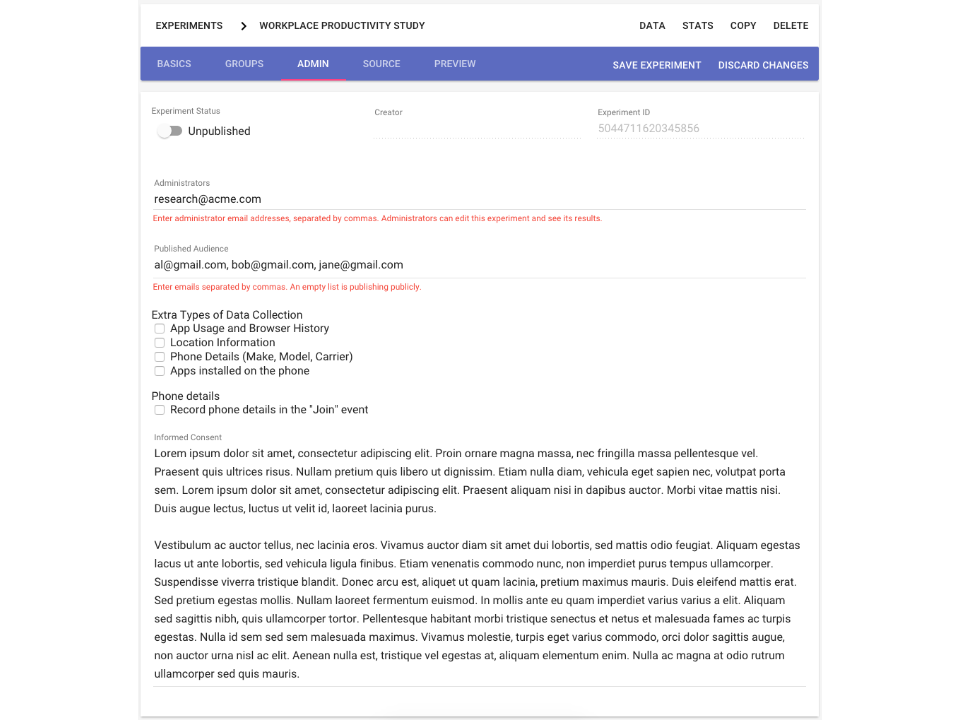
- On the "Admin" tab, add a published audience and your own informed consent text (not Lorem ispum!).

- When you’re ready, publish your experiment so that your published audience can join it. You’ll need to save first, if you haven’t already.

Let’s imagine that you want to supplement your ESM study on workplace productivity with additional follow-up questions about each response at the end of each day. This calls for adding an end-of-day group.
The following steps pick up after step 7 above.
-
We’ll need to create a new experiment group, since the end-of-day inputs (questions) are different than those during the day. At the bottom of the "Groups" tab, click “Add Experiment Group.”
-
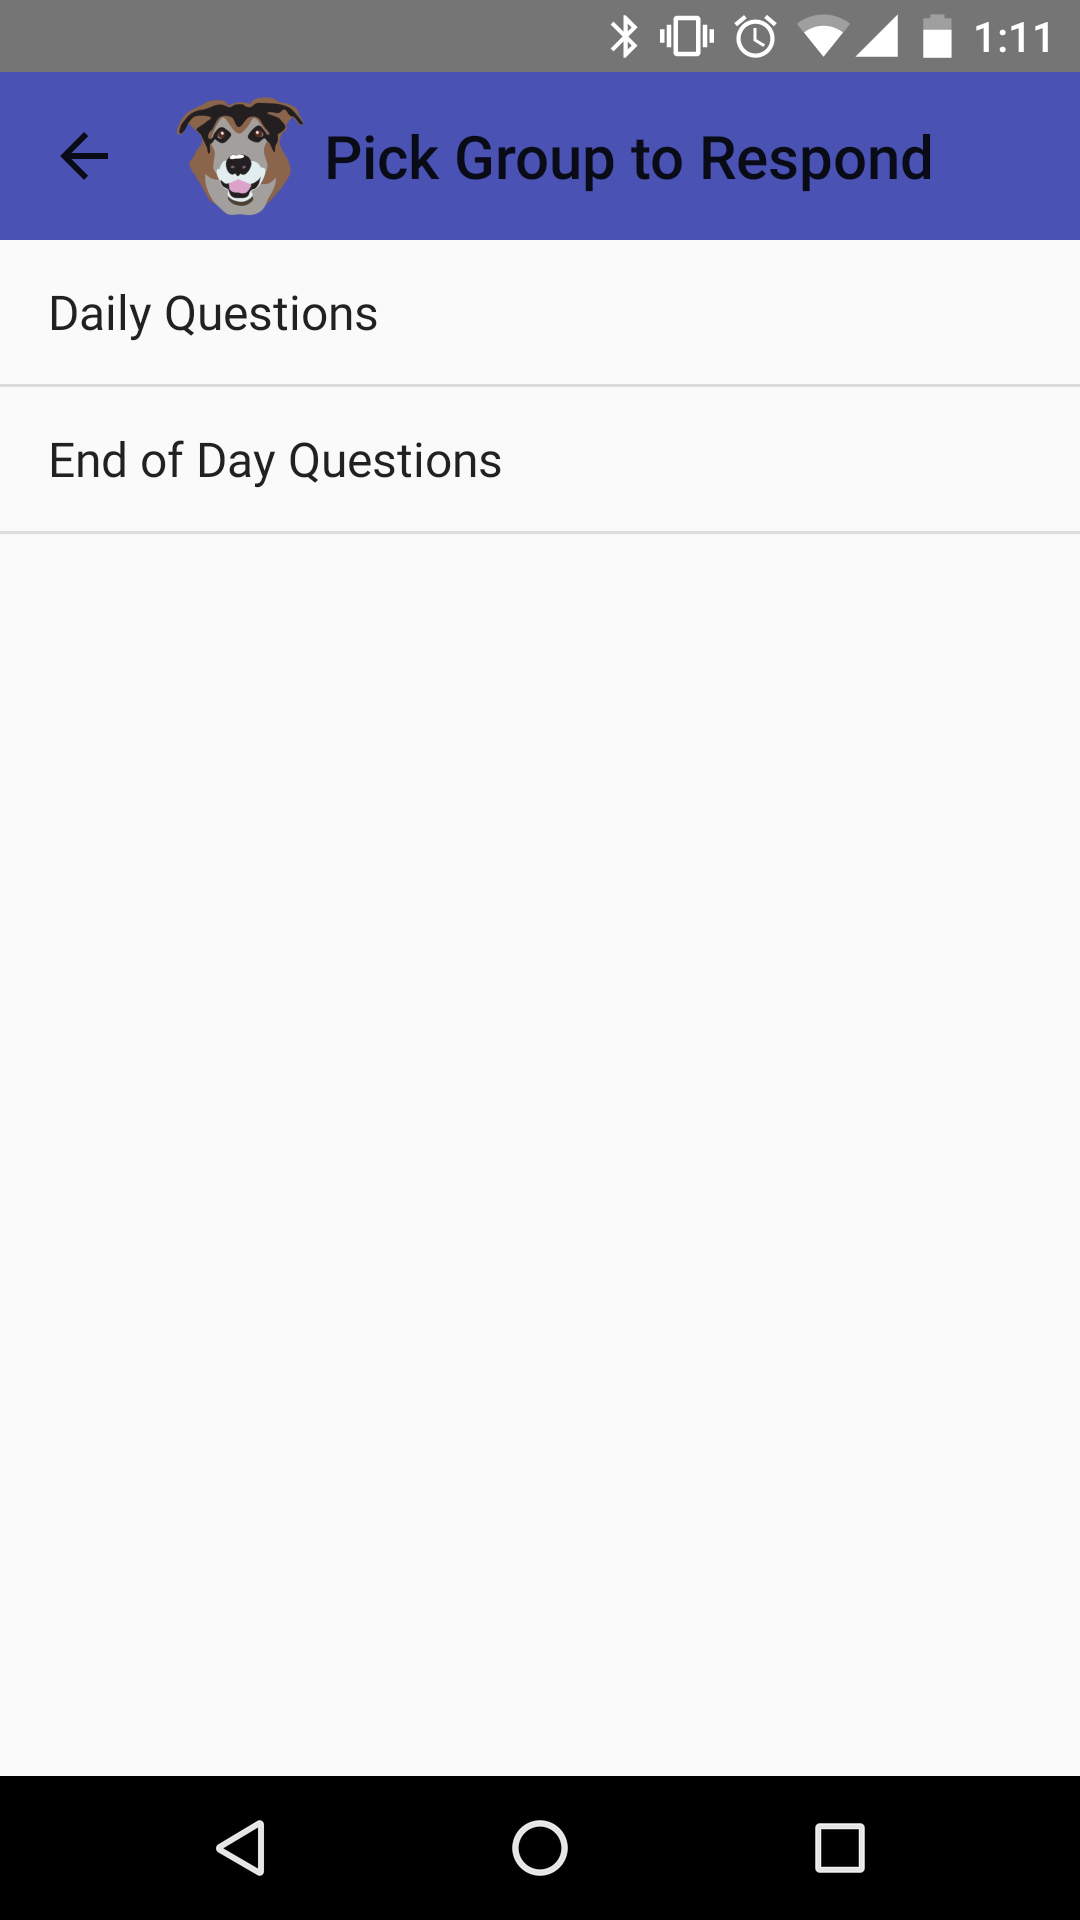
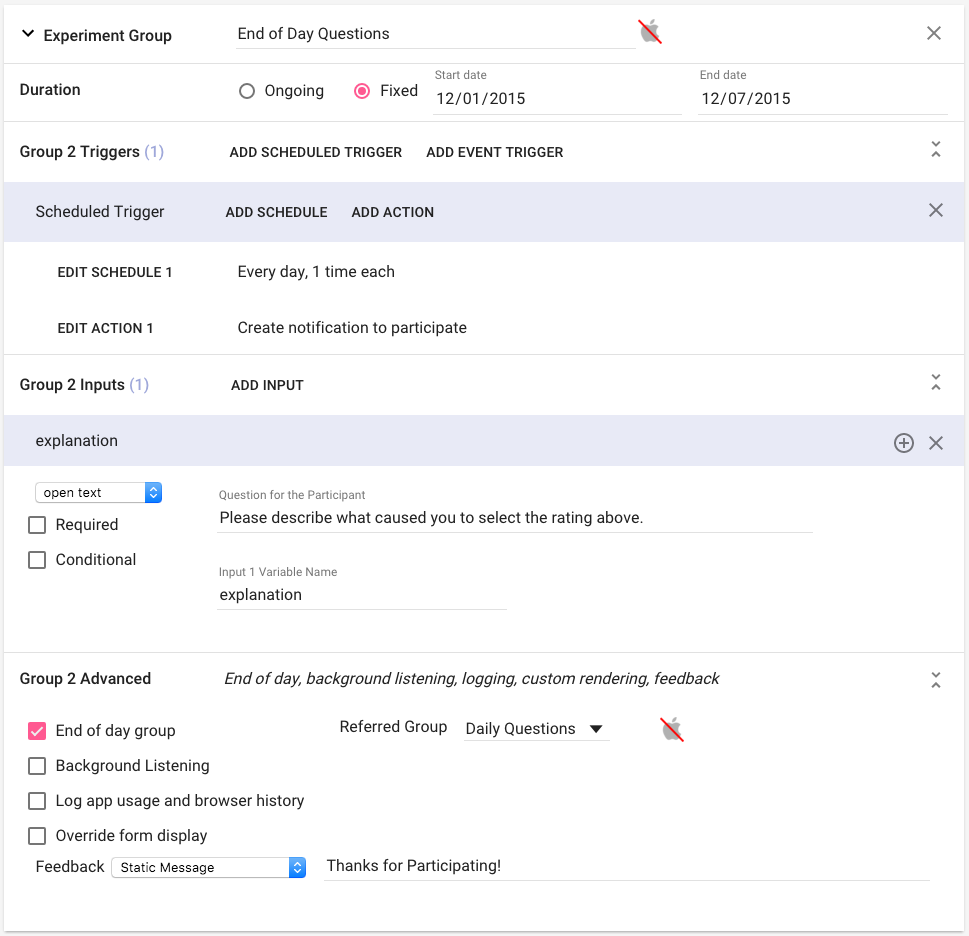
You should rename each group, since participants will see these names if they attempt to self-report data (e.g., they’ll see the screen below).
- In this case, we’ll set the duration for the new experiment group to match our original group.

- We’ll set this group as an end-of day group in the "Advanced" subsection, referencing our 1st experiment group (which we renamed “Daily Questions”).
NOTE: Avoid renaming the groups after linking them; see this known issue for details.

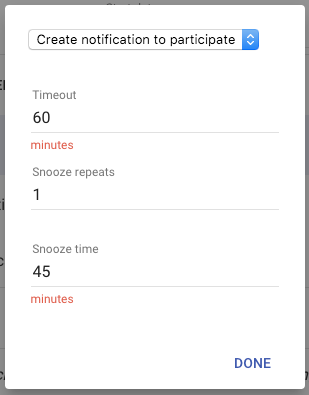
- We’ll now add a new scheduled trigger to our end-of-day group whose action is to create a notification to participate every evening. As before, we’ll label the schedule time and leave it user-editable so that participants can customize the schedule to fit their daily lives. We’ll also extended the timeout to 60 minutes, since the end-of-day questions are intended to be reflective rather than in the moment.
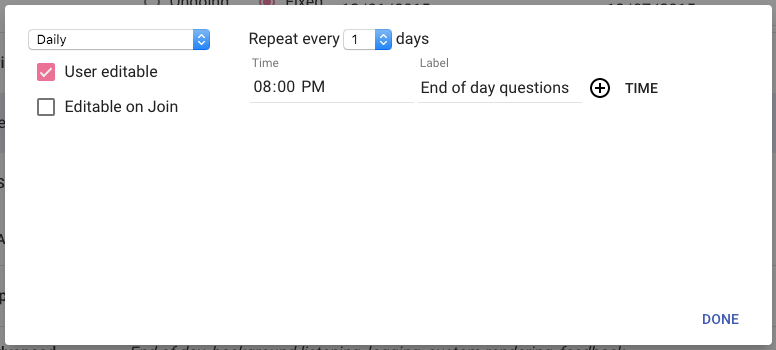
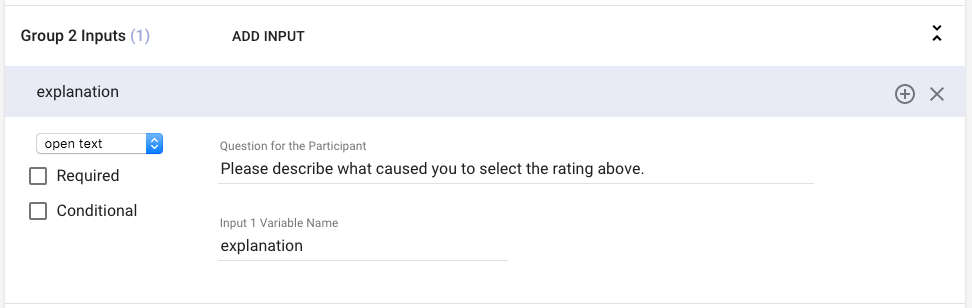
- Now we’ll add our end-of-day inputs. In this case, we’ll ask an open-ended question. Paco asks this question about each response submitted to the "Daily Questions" group since the last end-of-day question. Note that we added a variable name, which is required.
- Review our new experiment group before moving on.
- On the "Admin" tab, save changes to the experiment and ensure that it’s published (see steps 8 and 9 of the previous ESM experiment).
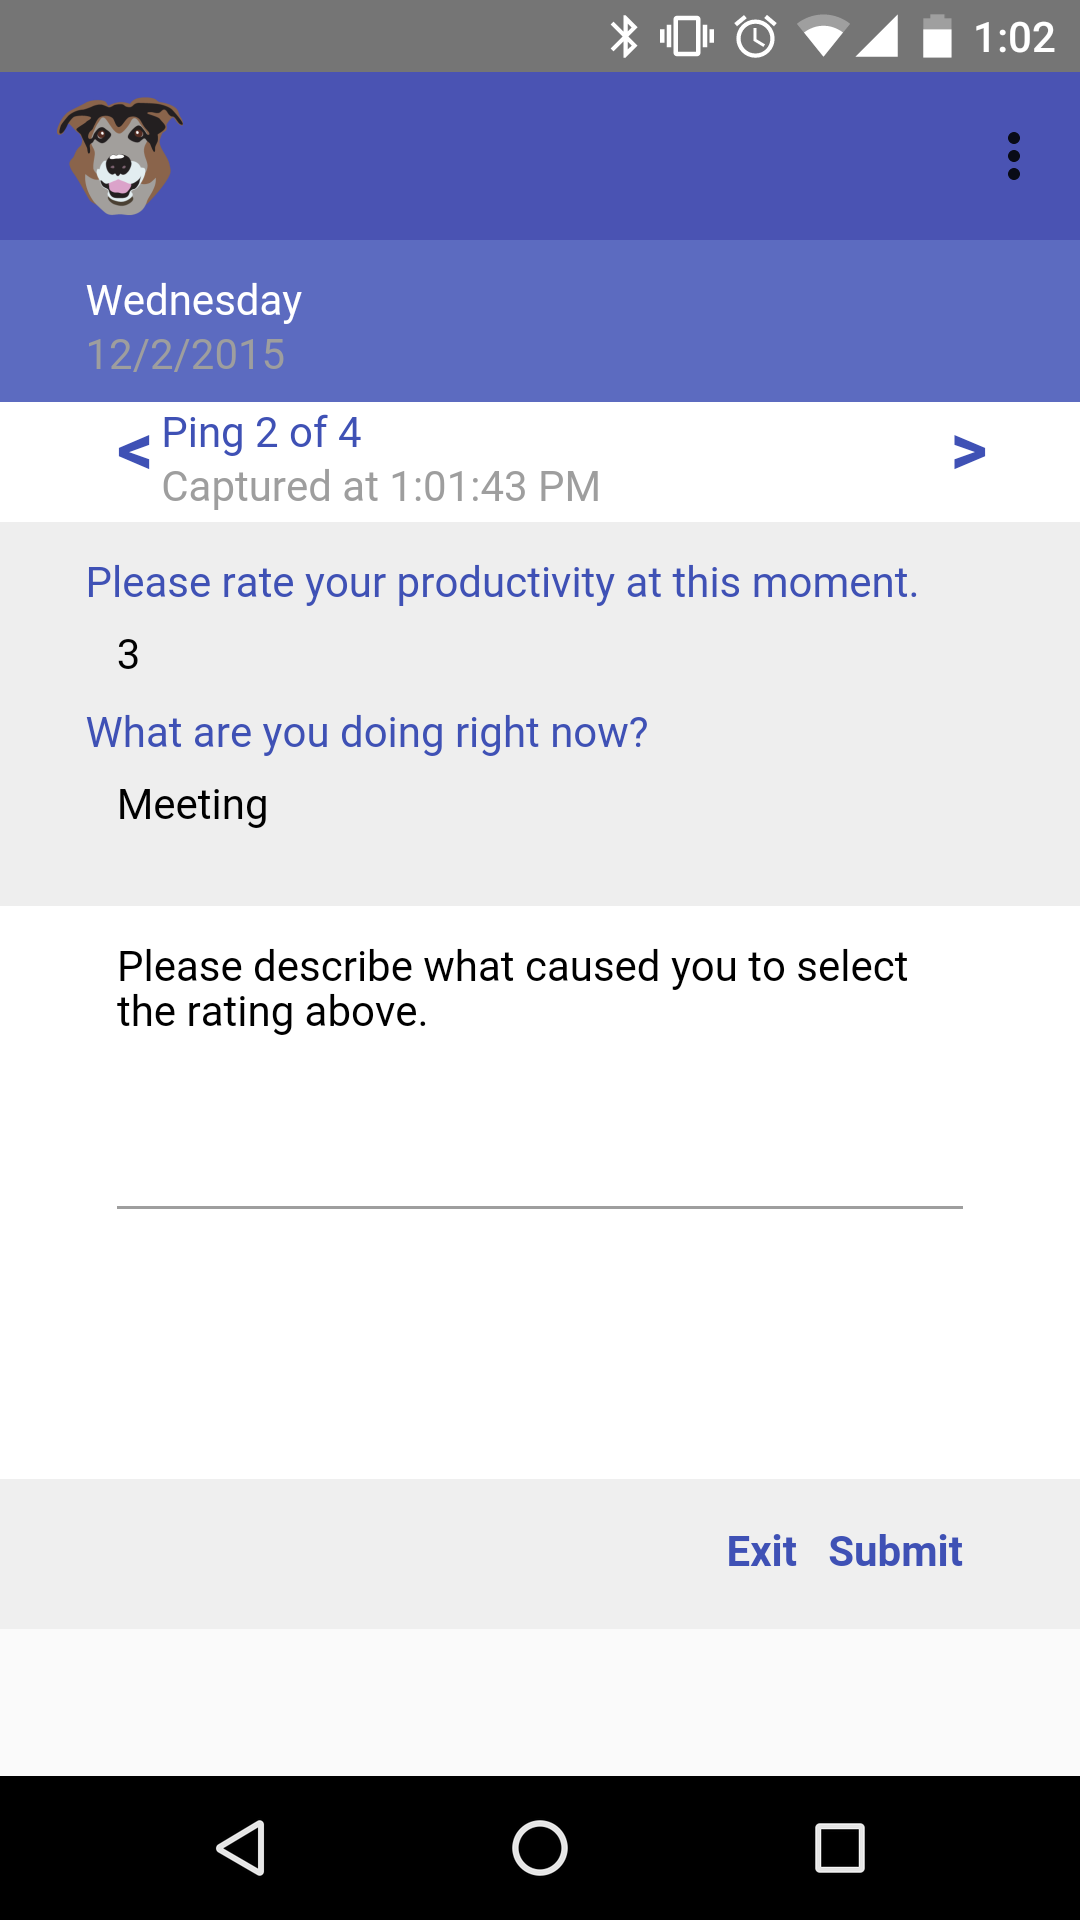
Below is what participants will see when responding to end of day group questions. They review each submitted response since the last scheduled end of day group (from newest to oldest) using the left/right arrows. Paco shows their response and response time, with the end of day group questions below.

NOTE: Due to platform limitations, app triggering is not supported on LG phones (G2 onward).
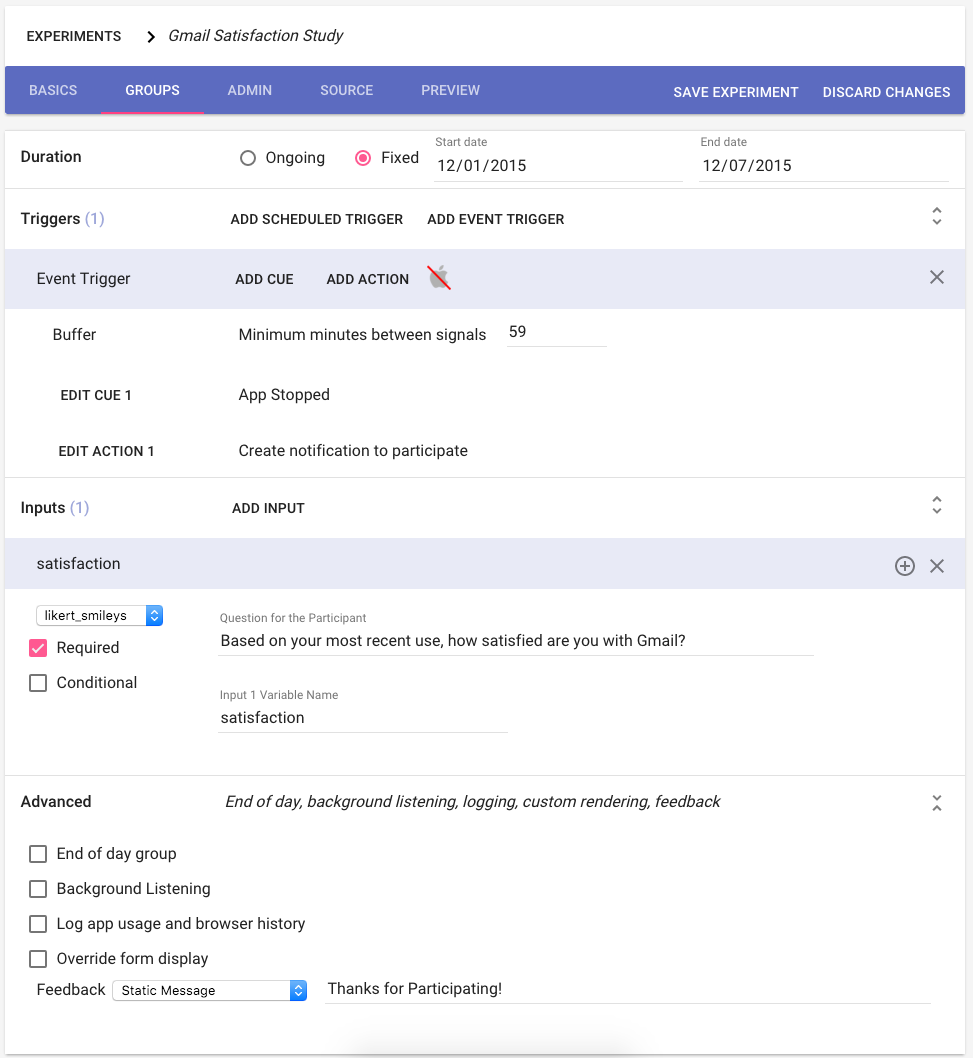
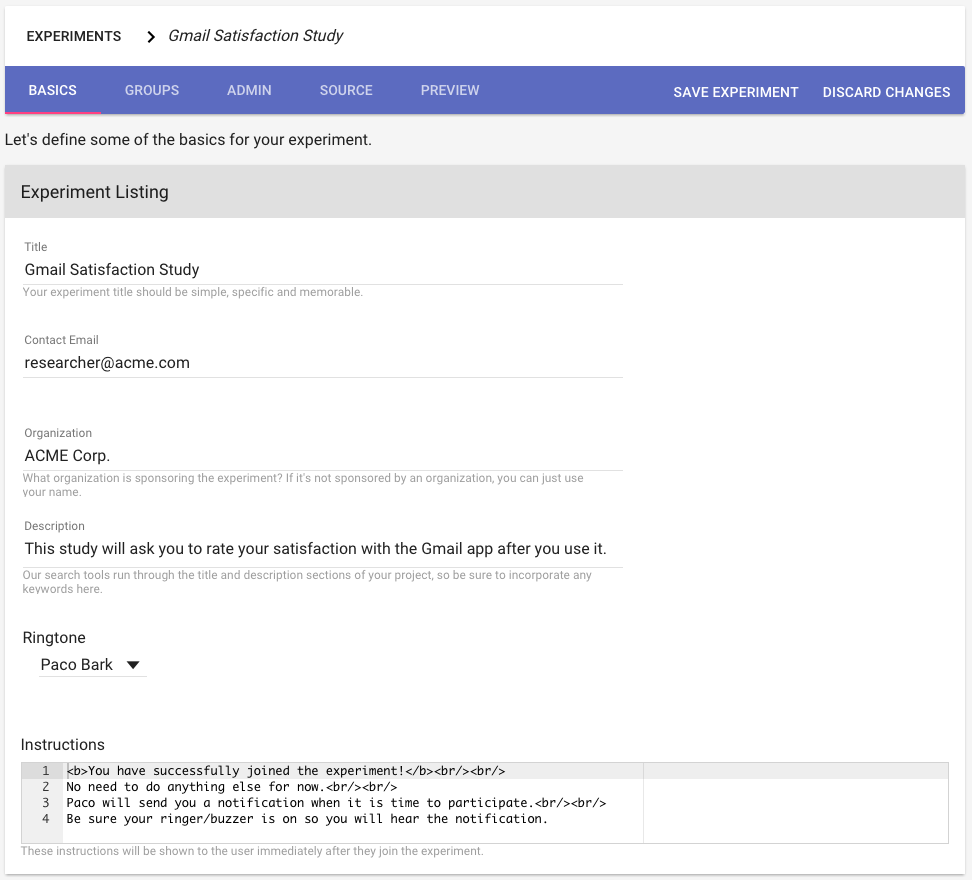
Let’s imagine that you want to ask participants about their satisfaction when they use a particular app. This study is a good candidate for app triggering.
The following steps will create an event triggering study that uses the app of interest as the trigger. The study will run for 7 days.
-
Sign into PACO (pacoapp.com) and create a new experiment.
-
Fill in the information on the "Basics" tab. You may want to update the instructions to remind participants about to what to expect during the study.

- On the "Groups" tab, update the duration to span 7 days.

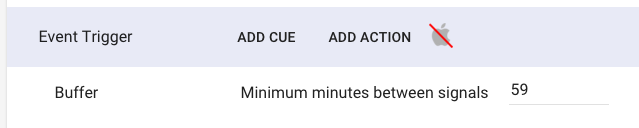
- Add an event trigger. We’ll leave the buffer at 59 minutes, which means that Paco will ping the participant, at most, once per hour, even if they use the Gmail app more often.
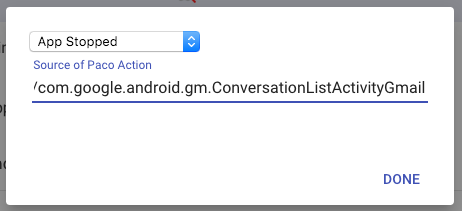
- Edit the cue. In this case, we want to ask the participant questions after using Gmail, so we’re using the "App Stopped" cue event. We’ve determined the source experimentally by creating an app logging experiment.
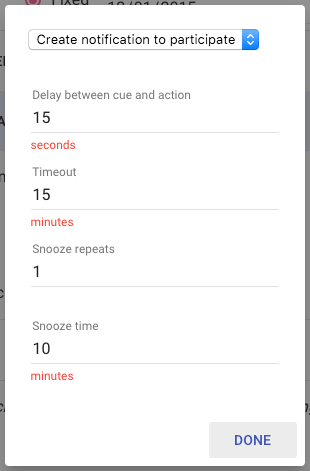
- Now edit the action that Paco takes at each event trigger. In this case, we want to notify participants to participate to answer our survey question (inputs). Paco will ping them 15 seconds after they close the app (i.e., no longer visible on the screen). We’ll give them 15 minutes before we decide that they haven’t responded quickly enough, and we’ll remind them once 10 minutes after the initial notification (i.e., 5 minutes before timeout).
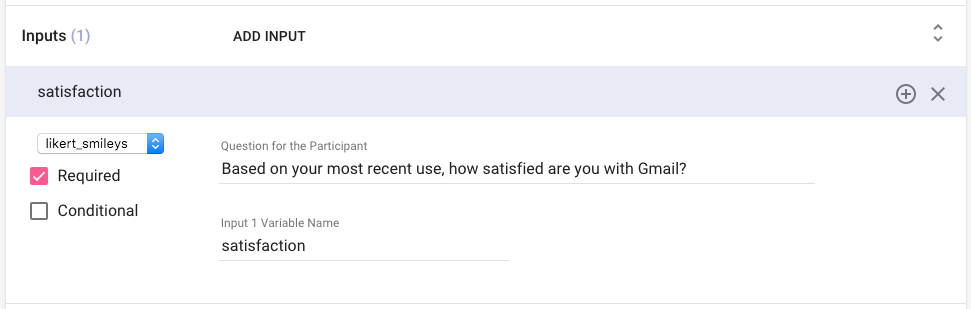
- Add an input. In this case, it’s just 1 required, likert-scale question. Note that we added a variable name, which is required.
- Review the "Groups" tab before moving on. We haven’t used any of the options in the “Advanced” subsection.
- On the "Admin" tab, add a published audience and your own informed consent text (not Lorem ispum!).
- When you’re ready, publish your experiment so that your published audience can join it. You’ll need to save first, if you haven’t already.

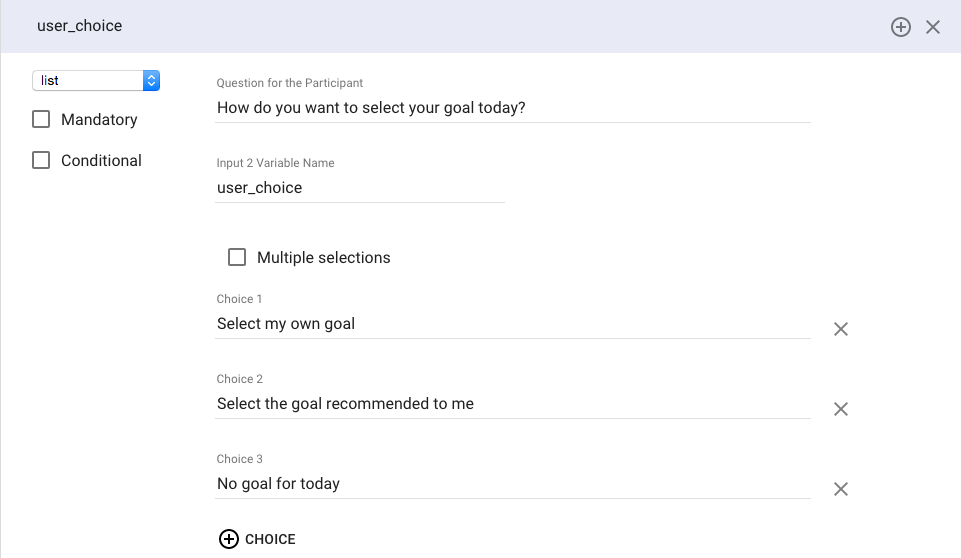
Let’s imagine that you want to recommend step goal for each day based on last week’s steps + 500 steps. For example, if today is Wednesday, then if the user walked 5000 steps last Wednesday, then the goal for today is 5000 + 500 = 5500.
Everyday at user specified time, they are given 3 choices to choose their goal.
-
Select their own goal
-
Select the recommended goal (see above)
-
No goal for today
The following steps will create this experiment using custom code.
-
Sign into PACO (pacoapp.com) and create a new experiment.
-
Fill in the information on the "Basics" tab. You may want to update the instructions to remind participants about to what to expect during the study.
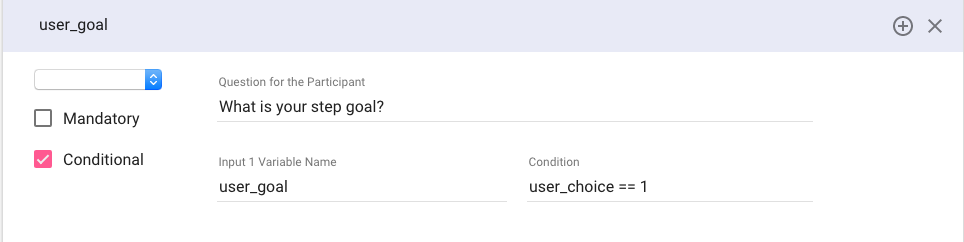
- On the "Groups" tab, start by creating an input for the 3 choices listed above. Be sure to name the input variable (user_choice).
- Now create another input that is conditional on the first input response. Notice that for the condition user_choice == 1, user_choice is the name of the first input.
- Now we’ll add 3 scheduled triggers: one to notify participants to select a goal, another to check if they met their goal for today, and a third to store the steps taken by the participant for today to the database.
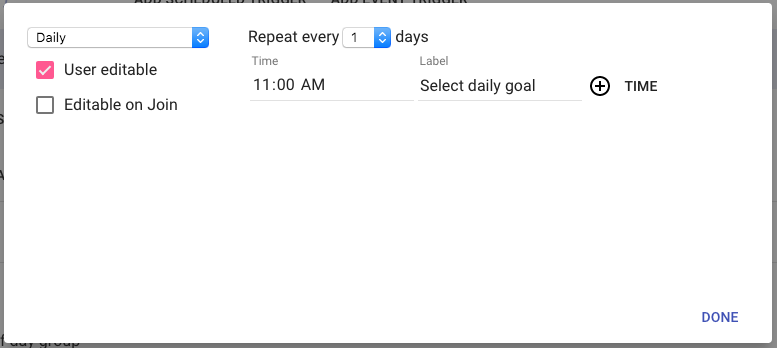
Add the first scheduled trigger, then select EDIT SCHEDULE. In this case, we want to trigger at the same time each day. We’ll allow the participant to edit this time to fit their schedule. We’ve labeled the time to suggest our intent, in the event the participant does change the time.
- Edit the action. In this case, we’ll select "Execute Script" and paste in the script below. This code checks if there are any steps for last week (same day) from the DB and adds 500 to it to notify the user of their new goal, if they selected “Recommended Goal” in the user_choice input. If not, it creates a notification for their new goal accordingly.
| var goal_today = -1;
// this removes all notifications so that it does not clash with the notification that we are going to create paco.notificationService.removeAllNotifications(); if(paco.db.getMostRecentAnswerFor("user_choice") == 1) { goal_today = getUserSpecifiedGoal(); paco.notificationService.createNotification("Your goal for today is " + goal_today + " steps"); } else if(paco.db.getMostRecentAnswerFor("user_choice") == 3) { goal_today = 0; paco.notificationService.createNotification("No goal for today, relax and get ready for tomorrow"); } else { var events = paco.db.getAllEvents(); var lastWeekStepCount = getStepCountFromLastWeek(events); var newGoal = lastWeekStepCount + 500; paco.notificationService.createNotification("Your goal for today is " + newGoal + " steps"); goal_today = newGoal; } //store goal for current day in DB saveToDB(goal_today); //function to save data to DB function saveToDB(goal) { var experiment = paco.experimentService.getExperiment(); var event = paco.createResponseEventForExperimentGroup(experiment, null, null, null, null, null); event.responses.unshift({ "name" : "dailyGoal", "answer" : goal_today, "answerOrder" : goal_today }); paco.db.saveEvent(event); } //function to get step count from last week function getStepCountFromLastWeek(allEvents) { var d = new Date(); var dt = d.getDate(); var lastWeekSameDay; var lastWeekDt = getLastWeekDate(); var prevGoalMth = -1; } //function to get user specified goal function getUserSpecifiedGoal() { var steps = paco.db.getMostRecentAnswerFor("user_goal"); if(steps != null) return steps; else return 5000; } //function to get date 7 days before today function getLastWeekDate() { /* Jan, Mar, May, July, Aug, Oct, Dec - 31 Apr, June, Sep, Nov - 30 Feb - 28 */ var d = new Date(); var dt = d.getDate(); var mth = 1 + d.getMonth(); var yr = d.getFullYear(); var leapYear = false; var no_of_days = 0; } |
- Create a new scheduled trigger. Note that we can’t just add a schedule and action to the existing scheduled trigger, since this would cause Paco to also run the action that we previously created (we want to run a different action on a different schedule).

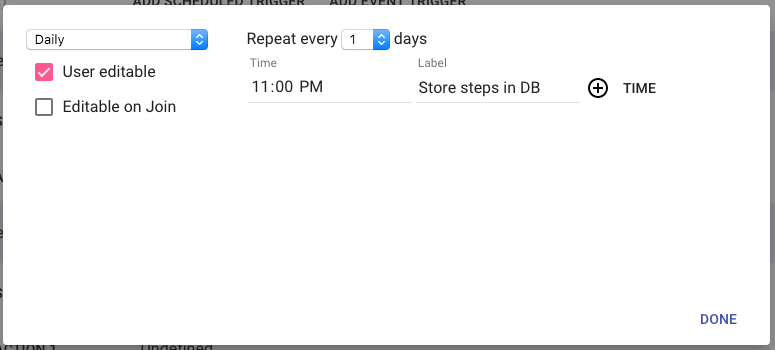
- Edit the schedule for the new scheduled trigger. Since this is to upload the steps taken during the day, we’ll set it to occur daily in the evenings. As before, we’ve labeled the time and given the participant the option to adjust it.
- Edit the action to execute the script below. This code stores the steps taken today to the Database with the name "dailySteps"
| var steps = sensors.getStepCountFrom(1); if (steps != -1) { var experiment = paco.experimentService.getExperiment(); var event = paco.createResponseEventForExperimentGroup(experiment, null, null, null, null, null); event.responses.unshift({ "name" : "dailySteps", "answer" : steps, "answerOrder" : steps }); paco.db.saveEvent(event); } |
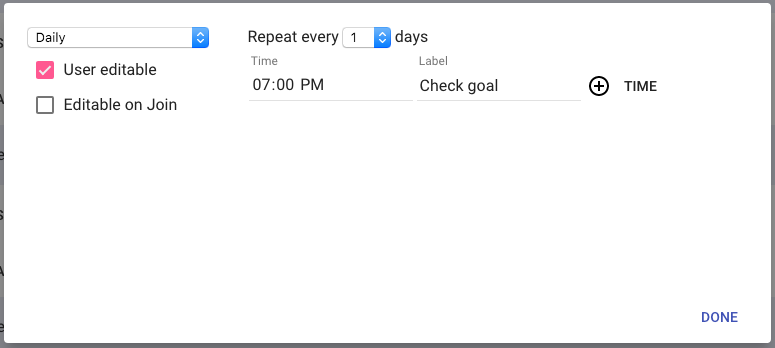
- Create the last scheduled trigger (3 in total). Edit the schedule as shown below and edit the action to execute the script below. This code checks whether you have met your goal for today. If you did, it will send you a notification inform you about your achievement.
| var steps = sensors.getStepCountFrom(1);
var goal_today = paco.db.getMostRecentAnswerTodayFor("dailyGoal");
if(steps >= goal_today) { paco.notificationService.createNotification("Good Job! You have reached your goal for today"); } |
- Review the "Groups" tab before moving on. We haven’t used any of the options in the “Advanced” subsection.

- On the "Admin" tab, add a published audience and your own informed consent text (not Lorem ispum!).
- When you’re ready, publish your experiment so that your published audience can join it. You’ll need to save first, if you haven’t already.