Caution
THIS IS A WORK IN PROGRESS.
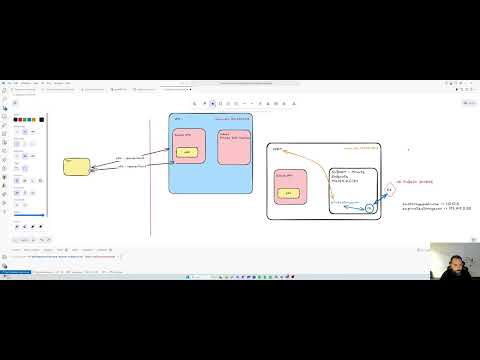
The Secure Azure Connection project provides a comprehensive solution to deploy a Point-to-Site (P2S) VPN in Azure. This setup includes a private DNS resolver and scripts to connect the solution with other "hub" Virtual Networks (VNets), enabling VPN clients to interact seamlessly with Azure resources.

For a step-by-step guide on how to deploy and configure the Secure Azure Connection project, you can watch the following YouTube video:
This video provides detailed instructions on setting up the project, configuring the VPN, and resolving common issues.
- Direct Connection: Allows developers to connect directly from their desktops to Azure resources without needing to set up a VM and manage it through Intune.
- Simplified DNS Management: Users do not need to modify hosts files as private endpoint resolution is handled within the VPN.
- Enhanced Security: Ensures secure communication between on-premises machines and Azure resources through a secure P2S VPN connection.
- VNet Deployment: Deploys a Virtual Network (VNet) with two subnets:
- One subnet for VPN clients.
- One subnet for the private DNS resolver.
- Hub VNet Connectivity: Includes scripts for connecting the solution with other "hub" VNets.
- Bicep Templates: Provides Bicep templates for resource deployment.
- Deployment Scripts: Includes scripts to facilitate the deployment process.
-
Clone the Repository:
git clone https://github.com/jsburckhardt/secure-azure-connection.git cd secure-azure-connection -
Configure Azure CLI:
Ensure you are logged into your Azure account:
az login
-
Deploy the Bicep Templates:
Execute the deployment script to deploy the resources:
make deploy PREFIX=vpnaisv1
-
Create the VNET links for your private dns zones
Update the
src/infra/linkConfig.jsonfile with the correct values for yourvpnvnet.{ "links": [ { "name": "vpn-link-blob", "dnsZoneName": "privatelink.blob.core.windows.net", "networkLinkVpnName": "vpn-st-blob-link-vpn" }, { "name": "vpn-link-file", "dnsZoneName": "privatelink.file.core.windows.net", "networkLinkVpnName": "vpn-st-file-link-vpn" } ] }Then run the following command to create the links:
make links
-
Run VNET configuration script
The vnet configuration script is in charge of configuring the VNET with the DNS settings and configuring the peering.
First create a copy of the
sample.envfile and configure your.envfile with the correct values.make configure
-
Configure VPN
TODO: steps
- create self-sign cert
- get public key for CA
- configure p2s vpn with openvpn and IKEv2
- add cert
- download client
- Currently the azure vpn config is not pulling all the CAs you add into the configuration. Here is a video on how to fix it link