This project is built around Piper.
local-piper currently only supports Linux (while Piper itself supports quite a lot) and uses the 2023.11.14-2 Linux x86_64 Piper release. However, it shouldn't be too hard to fork it for Windows if you wanted to! Just make sure you choose the right Piper version from the main Piper branch for your OS and replace the files in ./Piper. I'm primarily a Linux user and have no plans to port this project at present.
UPDATE: I have added a Streamlit app file that can be used in place of the gunicorn server. This is not fully documented. I will update this page in future with some notes regarding the requirements for running the Streamlit app.
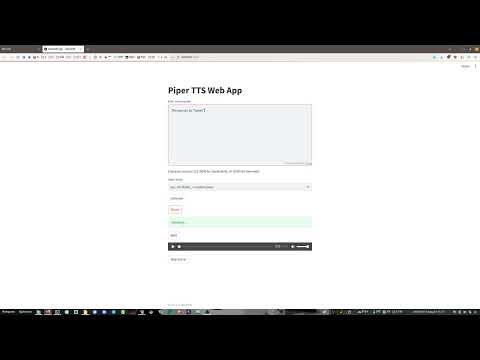
local-piper is a browser-based front-end for the local neural text-to-speech (TTS) system called Piper. local-piper was built using Flask, but has now moved to Streamlit; the original files for both options remain. It allows users to convert text into speech using various pre-trained voice models.
I recommend the "en_US-libritts_r-medium" voice model for a clear English-speaking voice. See "Prerequisites/Installation and Setup" for voice model installation.
- Convert text input into spoken audio directly using selected voice models.
- Choose from a variety of voices available in the application.
- Real-time feedback on the processing status of TTS commands.
- Store and play generated audio directly in the browser.
- Options for direct to speaker-output (Speak), .wav file generation (Generate), or both (Both).
-
Clone the repository to your local machine:
git clone https://github.com/krones9000/local-piper.git
and add "voices" and "output" folders within the "./static" folder.
-
Install the required Python packages using pip (if you're on a brand new machine, you may need to
sudo apt install python3 python3-pipfirst):pip install -r requirements.txt
If you want to run the Streamlit app, you may also need to run:
sudo apt install streamlit
pip install streamlit
pip install psutil
In my case, when I first tried to run the Streamlit app, it told me what libraries I was missing. So there might be some others. But if you carry on below and read any error messages, they should point to any missing libraries you need to pip install. The Streamlit app can then be run using:
streamlit run streamlit_app.py
once you've completed the steps below to configure the rest of your setup. In my case, I had to restart for Python/Streamlit to work properly. If you're on Windows, you'll need to look up how to install/call/run Streamlit. I haven't done this but imagine it's not much different if you Google it. I have updated the configuration file to take account of how Streamlit handles absolute/relative locations. I have not tested this in Windows. You may find that you need to alter the locations of your voices and output folders in the CONFIGURATION FILE.
-
Populate the ./static/voices folder with your chosen voice model files from Hugging Face.
You must have .onnx and .json files for any given voice. If these are not both present, the voice will not be available in the web app. Piper requires that voice models use the following format:
NAME.onnx
NAME.onnx.json
You will note that Hugging Face does not provide names in this naming format and you will need to rename the files.
-
Remove the files for either the HTML or Streamlit versions, depending on which you prefer to use.
-
Run the Flask application by launching terminal in the local-piper directory or navigating to it with
cd. Then run:gunicorn -b 127.0.0.1:5000 -w 4 app:app --timeout 600
A timeout instruction is given to avoid timeouts during long generations. You can adjust this if desired but you may encounter errors.
-
Access the application in your web browser at http://127.0.0.1:5000.
-
Enter the text you want to convert to speech in the text input area.
-
Select a voice from the dropdown menu.
-
Click the "Speak", "Generate", or "Both" button to initiate the TTS command.
-
Monitor the processing status for feedback on the command execution.
-
Listen to the generated audio through your speakers or by using the embedded audio player depending on which generation approach you selected.
-
Output Generations: Outputs are stored in ./static/output. The 5 most recent outputs are retained and stored with datetime name format. To change this, you can edit MAX_FILES_TO_RETAIN in the tts_handler.py file.
-
Stopping the Server: To stop the server, click the "Stop Server" button at the bottom of the page or press ctrl+c in the console.
-
Voice Selection: The dropdown menu dynamically populates with available voice models retrieved from the server.
-
Clear Text Box: Use the "Clear Text Box" button to clear the text input area.
-
App Icon Setup: A .desktop file is included to help you set up the app to be run from the Streamlit app should you choose to do so. In terminal run:
sudo nano /usr/share/applications/PiperWebApp.desktop
and populate the file with the .desktop file contents provided, adjusting Icon and Exec to match your location.
-
Streaming Parameters: Streaming parameters are below. I used the ones from the Piper repo README, which states: "This is raw audio and not a WAV file, so make sure your audio player is set to play 16-bit mono PCM samples at the correct sample rate for the voice." You could change them if you like by editing the line below in tts_handler.py:
subprocess.run(f"echo {quoted_text} | {' '.join(command)} | aplay -r 22050 -f S16_LE -t raw -", shell=True) -
CUDA: There seem to be some issues with CUDA implementation in Piper at the moment and I honestly couldn't figure out if it's being used or not.
It is commented out of stream_audio and generate_output_file in tts_handler.py by default (so you can edit them back in) but I have them both enabled on my local version (and therefore allegedly I am using CUDA) and it doesn't cause issues, whether CUDA is actually working or not.
Some commenters have suggested that Piper doesn't use CUDA even when told to do so. But honestly, generations run so fast that it's hard to tell if CUDA is being used or not either way.
-
Piper Release Versions: This version is built using piper_linux_x86_64.tar.gz from the Piper Releases Page. Make sure you have the appropriate version for your setting.
Contributions are welcome! Feel free to open issues or submit pull requests for bug fixes, enhancements, or new features.
This project makes use of the following third-party libraries and tools:
This project is licensed under the MIT License.