Install Allegro from binaries for MinGW and CodeBlocks
So, you want to set up Code::Blocks to use MinGW and Allegro 5? Thankfully, it's fairly simple once you get used to configuring a CB project.
NOTE Your MinGW version must match the version used to build allegro exactly.
First make sure your compiler is setup properly and working in a stand alone project. Go to Menu->Settings->Compiler and select the Toolchain Executables tab.
It should look like this for the MinGW-W64 compiler :
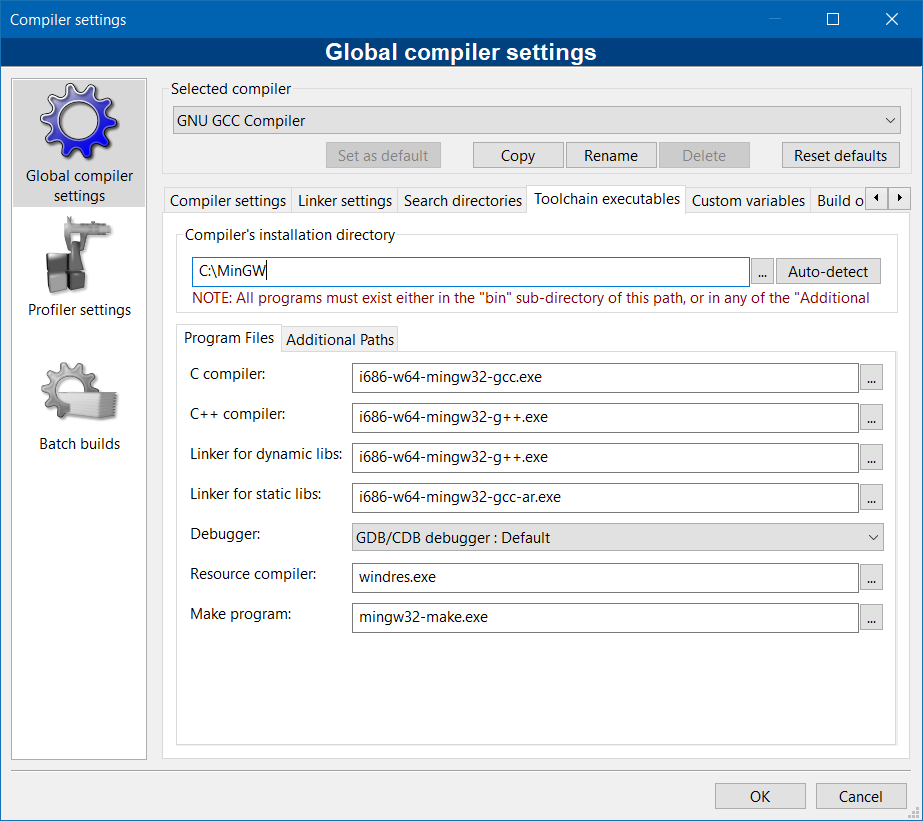
Note that this is a 32 bit compiler, and so it references the i686 executables for building with MinGW.
Now create an empty project and add the debug and release configurations as default. You can change this later. Do so by going to Menu->File->New and selecting Project from the options. Follow the onscreen instructions to setup your basic project. You will want to use an Empty Project as your project template (until such time as there is an Allegro project template). Give it a title, home folder, and filename and continue. Accept the default settings for the default configurations.
Now we need to configure our project to find and link to allegro.
Your binary distribition of Allegro 5 should come with 3 folders inside. These are the 'bin', 'include', and 'lib' folders contained inside the archive.
You may put these folders anywhere you like, but it is recommended NOT to install them to your compiler folder but to keep them separate.
For purposes of this guide, we will assume you have extracted the folders to c:\allegro. This gives you c:\allegro\include, c:\allegro\lib, and c:\allegro\bin . If you install them somewhere else, you will have to modify the paths given below accordingly.
Back to the project.
With the project open and active in CB, go to Menu->Project->Properties, and select the Build Targets tab. Duplicate the Debug and Release targets and name them DebugStatic and ReleaseStatic respectively. Next we configure the project settings. Go to Menu->Project->Build Options and select the overall project in the upper left (not the individual build targets).
Go to the Search Directories tab and select the compiler tab beneath. We need to tell our project where to find the headers for allegro. Add a new entry to c:\allegro\include and then select the linker tab. Here we tell our project where to find the link libraries for allegro. Add an entry for c:\allegro\lib to the linker tab.
One more step to go. We need to configure the linker settings for each build target that we have in our project (Debug , Release, DebugStatic, and ReleaseStatic).
You can see the linker options here :

Select Release and add a linker option to link to the allegro 5 dynamic release librar(ies). This guide uses the allegro monoliths, but if you are using the addon libraries individually you will need to add each of those here.
Linking with GCC and MinGW is done by passing the -l flag followed by the name of the library you wish to link minus the leading 'lib' and trailing '.a'. So to link libNAME.a you would pass -lNAME to the linker.
So for the Release target, add the linker option "-lallegro_monolith.dll".
Similarly for the Debug target, add the linker option "-lallegro_monolith-debug.dll".
The static versions are slightly more complicated, as you need to link all of the dependencies to allegro as well as the windows libraries.
For the DebugStatic target, you will want to add a linker option to link liballegro_monolith-debug-static.a by adding the flag -lallegro_monolith-debug-static .
For the ReleaseStatic target, you will want to add a linker option to link liballegro_monolith-static.a by adding -lallegro_monolith-static to the beginning of your linker options.
Link order matters with GCC, so we link allegro first, and then the dependencies.
The full list of libraries to link (not including allegro) are as follows :
-static
-ljpeg
-ldumb
-lwebp
-lFLAC
-ltheora
-lvorbisfile
-lvorbis
-logg
-lphysfs
-lfreetype
-lpng16
-lzlibstatic
-ldsound
-lgdiplus
-luuid
-lkernel32
-lwinmm
-lpsapi
-lopengl32
-lglu32
-luser32
-lcomdlg32
-lgdi32
-lshell32
-lole32
-ladvapi32
-lws2_32
-lshlwapi
-lpthread
-static-libstdc++
-static-libgcc
Now, we get back to the 'bin' folder that was included in the Allegro 5 binary distribution. If you linked everything correctly statically, you don't need any of the files from this folder. If however you linked dynamically (our Debug and Release targets) then you will need to copy all of the dll files from the bin folder to your program folder before distributing.
You should be all setup to compile your first allegro program now. I suggest you try the excellent Allegro Vivace tutorial here on the wiki.
Happy coding!